When Mistral released their Mistral 7B v0.2 model it was claimed to be the most powerful 7B Large Language Model (LLM) at that time. Now Mistral has released a new version, called Mistral 7B v0.3. The new version of Mistral 7B builds further on the success of the previous version.
The model has an increased vocabulary, from 32k tokens for the v0.2 version to 32.768 tokens for the v0.3. This increase in vocabulary amplifies the ability of the model to understand and generate more diverse language inputs. Furthermore, the model now has support for the version 3 Tokenizer. This tokenizer improves both the efficiency & accuracy of language processing. The last major update that the model received is that it now supports a feature called Function Calling, let’s dive deeper into what that means.
Function Calling enables the model to be connected to external tools. The ability to integrate the model with external tools, like user-defined functions or APIs, enables users to easily build applications which are catered to specific use cases, and solve practical problems. Examples of use cases that can benefit from this feature are:
- Extracting and tagging data, like names or dates from websites.
- Building applications that can transform natural language into database queries or API calls.
- Conversational knowledge retrieval engines that can now interact with knowledge bases more efficiently.
- Chatbots can now use external tools to answer questions more effectively.
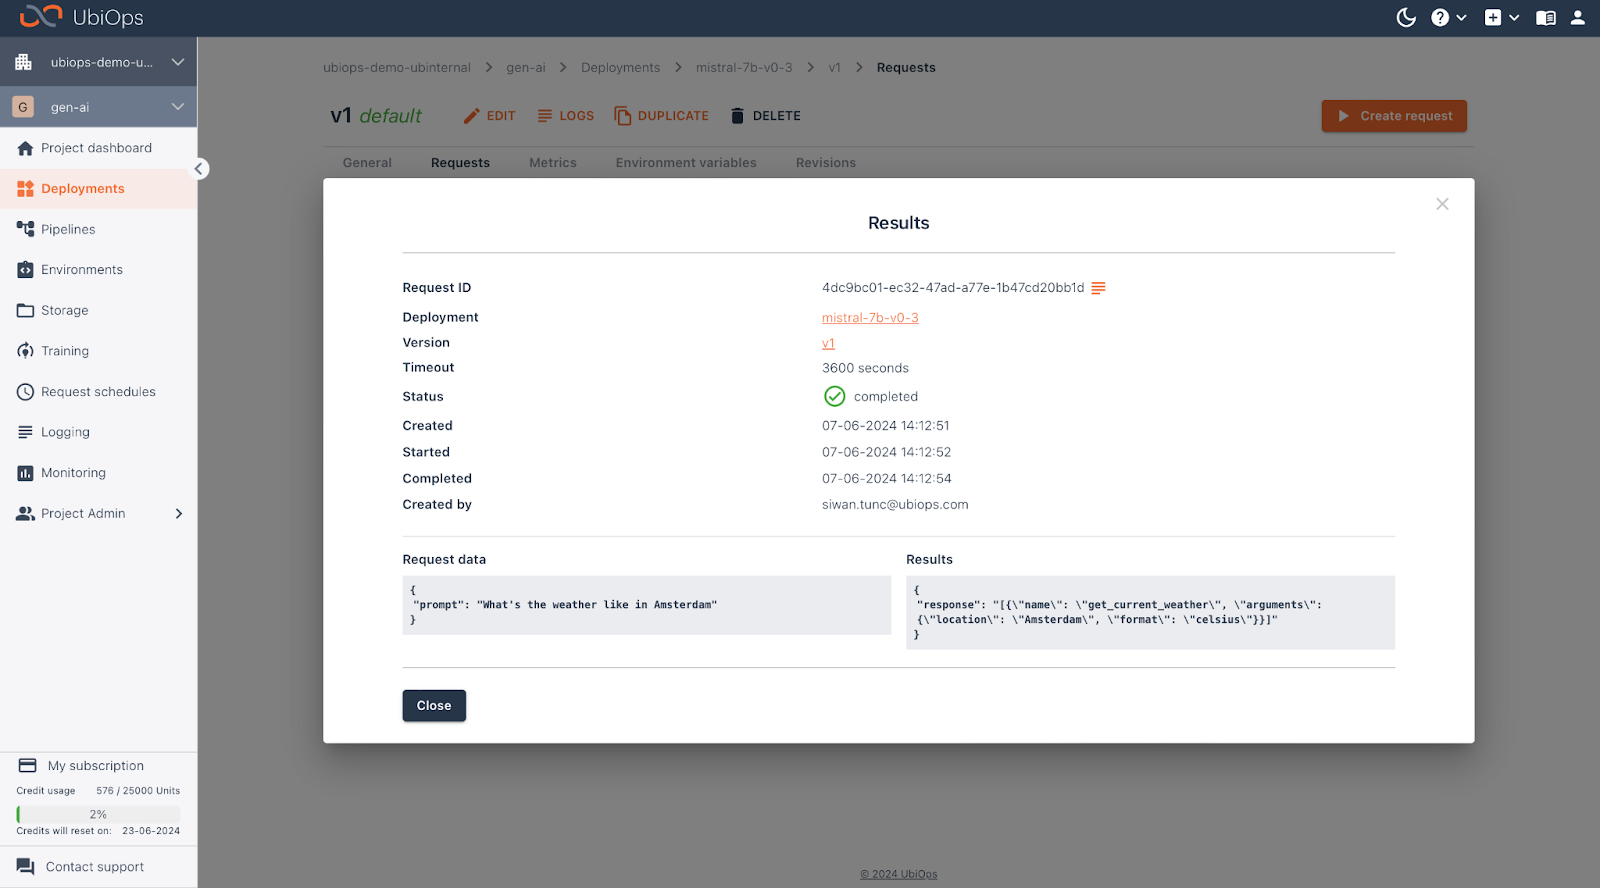
Let’s say a user enters a query like “What’s the weather like in Amsterdam”. Mistral is now able to convert this query into a function arguments for a user defined function like: “get_current_weather(location, string, unit ‘celsius’ | ‘fahrenheit’). These function arguments can then be used to retrieve the requested information from an external tool and use that tool to accurately answer the user’s question.
Function Calling used to be a feature that was reserved mostly for proprietary models, like ChatGPT. But with the release of Mistral 7B v0.3 this feature is now also available out of the box for open-source LLMs.
In this article, we’ll deploy the Mistral 7B Instruct v0.3, setup for Function Calling. In this case, the model will generate functions for retrieving the information about the current weather conditions of a certain location and will generate a function similar to the one mentioned earlier.
Note: To be able to download the model from Huggingface, you’ll need to have a Huggingface token with sufficient permissions.
Like the Mistral 7B v0.2 LLM, the Mistral 7B v0.3 is also available in an instruct-tuned version, called Mistral 7B Instruct v0.3.
This blog post will explain how you can deploy the new version of Mistral to UbiOps.
UbiOps is a platform where you can deploy all kinds of AI products, like Llama 3, Stable Diffusion, or the big brother of Mistral 7B: Mixtral to a production environment. In the background, UbiOps will take care of auto-scaling, and make sure that the model is always available, with the platform having an uptime of 99.999%. A fast inference time is ensured by granting you the possibility to run your model on state-of-the-art hardware. Working with private data also isn’t a problem with UbiOps, since you can use the platform on-premise, hybrid, or as a cloud solution for running your models.
We will use the UbiOps training functionality to download & upload the model to a storage bucket hosted on UbiOps, following the steps depicted in this how-to. You can find examples of executing the steps in the how-to for Mistral in the Appendix. Note that you can also use the standard set-up to deploy this model, where you download the model in the deployment itself. You can find examples of that set-up in our Deploy Mistral blog post, or tutorial.
The model can be deployed in three steps:
- Create a UbiOps account.
- Create a deployment.
- Make an API call for the model to run.
Requirements:
- A Huggingface token with sufficient permissions to download Mistral.
- A UbiOps account.
- The deployment package.
Let’s get started!
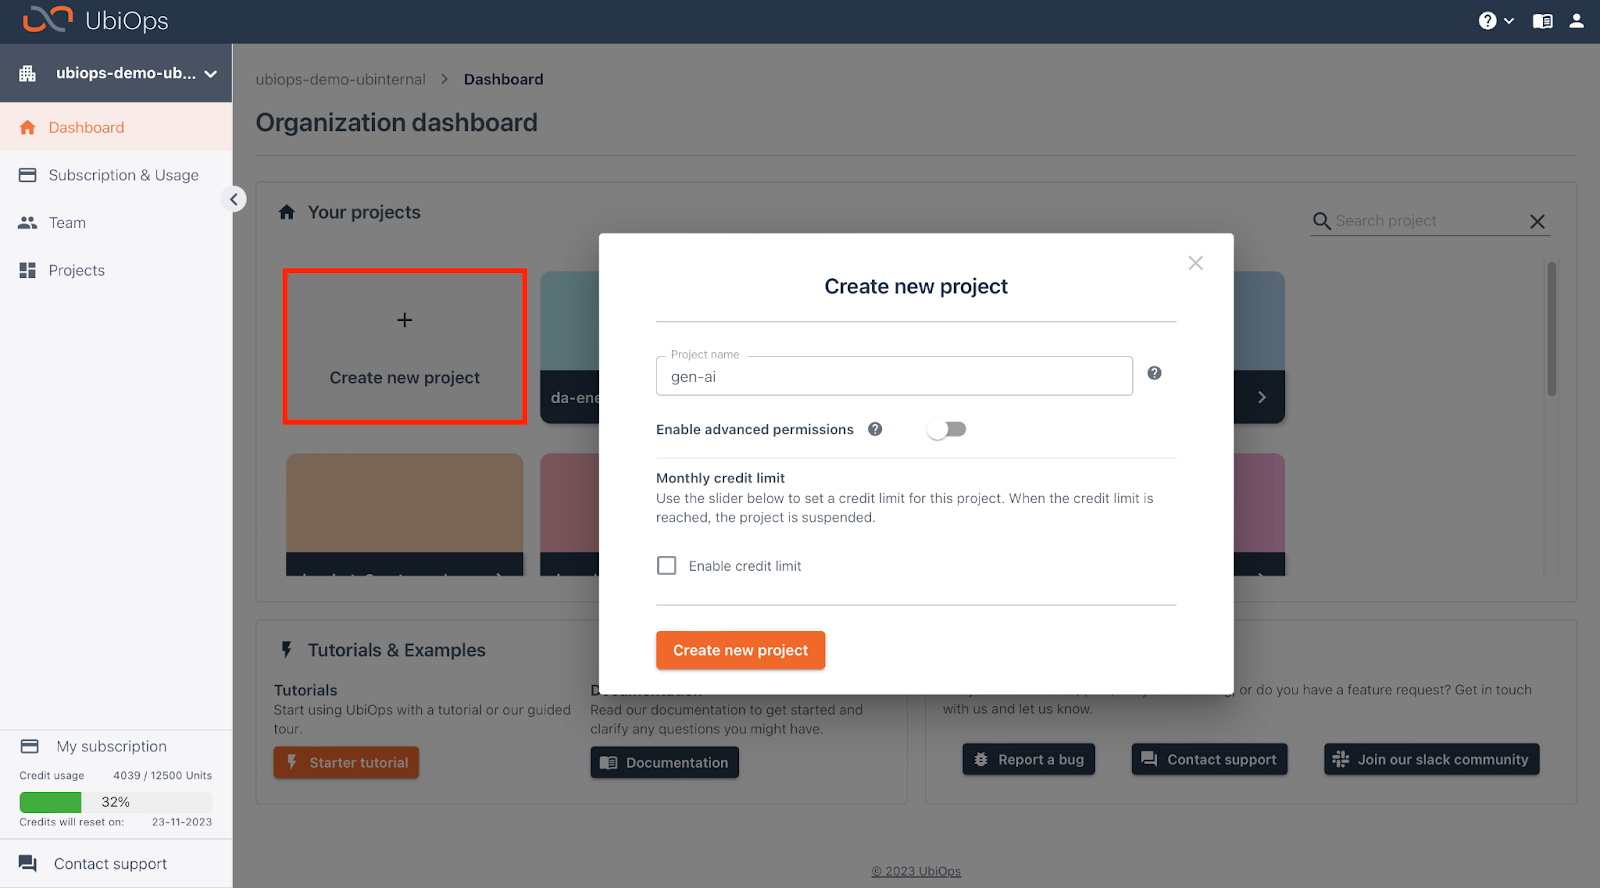
Create a project
UbiOps works with organizations, which can contain (multiple) projects. In each project, you can create multiple deployments (containerized code), experiments (training set-up), and pipelines (deployments chained together). More information about deployments and experiments will be provided later on.
If you haven’t already, go ahead and create an account. Then head over to the UbiOps WebApp and click on “Create new project”. You can give your project a unique name, or let UbiOps generate one for you.
Create the deployment
Now we can start building the deployment which will host our LLM. A deployment is an object within UbiOps that will serve your code to process data. Each deployment gets a unique API endpoint, which you can use to send requests to your deployment from another application or a front-end of some sort. You can for example create a front-end using Streamlit, and connect it to your deployment to serve requests. An example of that can be found in the Creating a front-end for your Mistral RAG guide. For each deployment, you need to define an input & output, so your deployment knows what kind of data it can expect. Each deployment consists of one or more versions. Each version will have the same in- & output as is defined on the deployment level but the deployed code, environment, and other settings can differ.
Navigate to the “Deployments” tab, and click on “+ Create” where we are prompted to fill in some parameters again. You can use the parameters provided below:
| Field | |
| Name | mistral-7b-v0-3 |
| Input | Name: prompt, data_type: string |
| Output | Name: response, data_type: string |

Now can we create a version by clicking on “Next: Create a version”. Here we upload this deployment package. Remember that you can create an environment explicitly, as we did with the environment for the experiment, and implicitly by adding environment files to the deployment package. In this step, we’ll upload this deployment package, which contains the following files:
- deployment.py: which contains the code that downloads the model from our UbiOps storage bucket, and gives instructions to UbiOps on how to handle requests.
- requirements.txt: which contains the additional dependencies.
- ubiops.yaml: which contains OS level packages.
For the instance type you need to select the “16384 MB + 4 vCPU + NVIDIA Ada Lovelace L4”. Note that GPUs aren’t accessible on default, you can contact our sales department to enable GPUs inside your project. You can use the following parameters for the version:
| Field | |
| Name | v1 |
| Deployment package | Upload this file |
| Environmnent settings | Ubuntu 20.04 + Python 3.10 + CUDA 11.2.2 |
For the version, we also need to create environment variables of::
- Your UbiOps API token
- The bucket name where the model is stored
- The directory of the model inside your bucket
You can create environment variables by clicking on the Optional/Advanced settings, or clicking on “Environment Variables” after the version has finished building.
You can use the following parameters for this:
| Environment variable | Value | Secret |
| UBIOPS_API_TOKEN | You can click on “Copy existing variables” and copy the environment variable you created for your experiment | Yes |
| BUCKET_NAME | Click “+ Create variable” and fill in the name of the default output bucket you selected while creating your experiment. | No |
| DIR | Click “+ Create variable” and fill in the value of the “dir” parameter you used for the training run, which we set as Mistral-7B-Instruct-v0.3 | No |
After uploading the deployment package, and selecting the instance type you can scroll down and click on the “Create” button. After which UbiOps will start deploying your code.
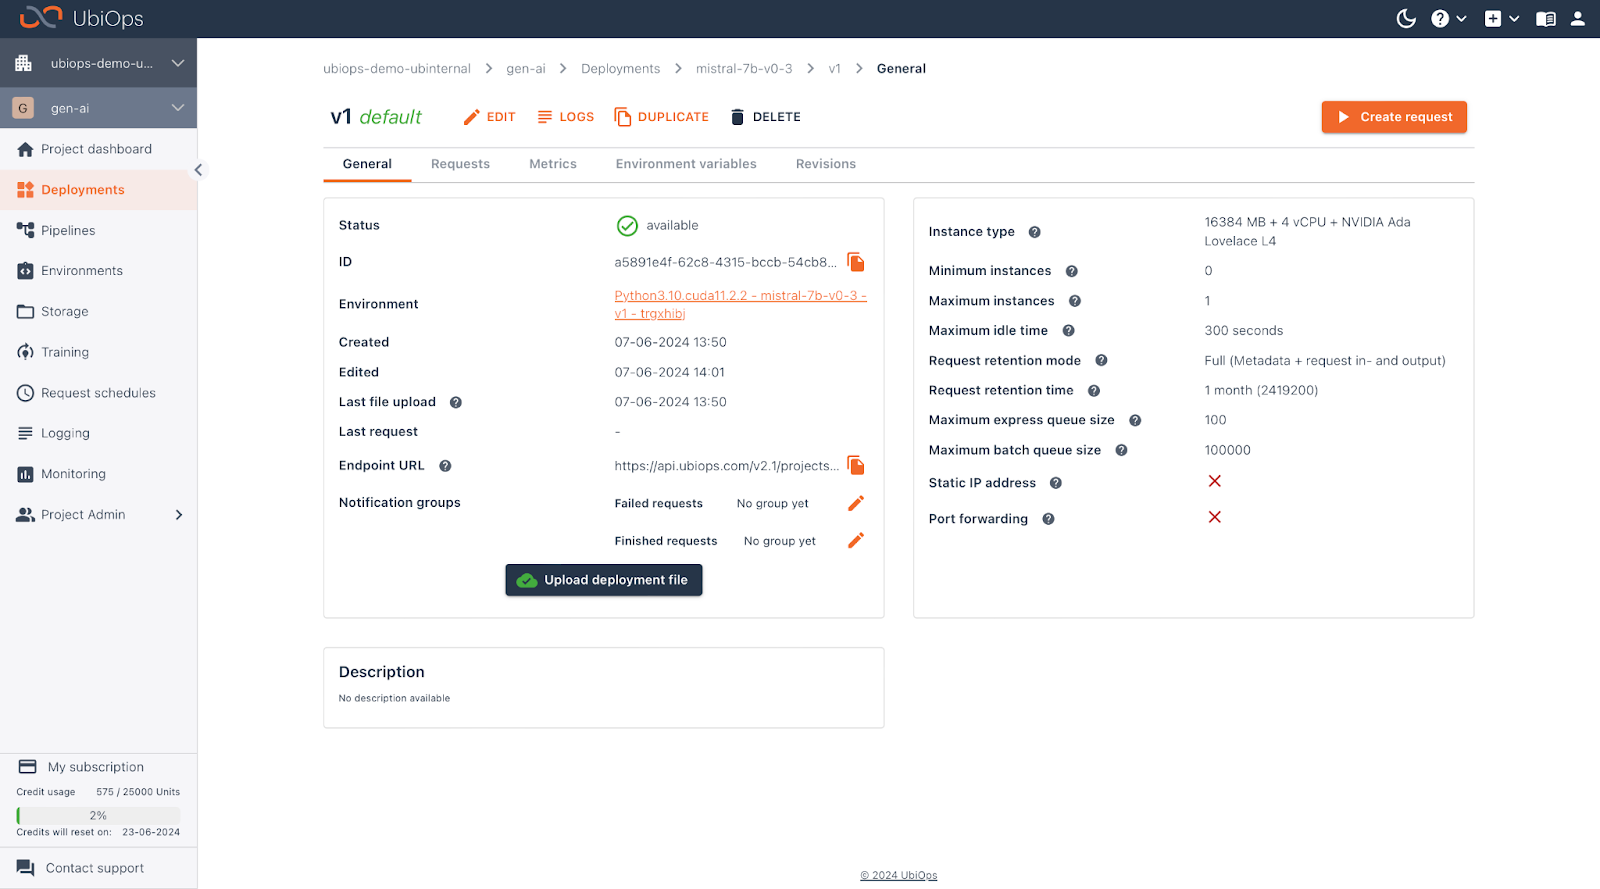
You can follow the progress of the building process by clicking on the “Logging” button, on top of the deployment or by navigating to the “Logging” page on the left-hand side of the Webapp.
When the deployment version has finished building it is able to handle requests. You can click on the “Create Request” button to create your first request. The prompt should be formatted in a certain way to leverage instruction fine-tuning. You can use the example prompt in the code block below for your first request:
What’s the weather like in Amsterdam?
Create a request
When the deployment version is finished building, it can process requests. Click on the “Create Request” on the top right to create your first request. In this case, the model expects a question about the weather circumstances of a certain location, the model will return a function call, which can then be used to retrieve the information from an external tool. This is out of the scope of this article, but stay tuned for a full end-to-end example.
An example input in this case would be “What’s the weather in Amsterdam?”.
And there you have it!
You have just created your very own deployment for the Mistral 7B v0.3 Instruct! Note that with some adaptations to the deployment code, you can also use this model with Instruct Following, you can find more information about that on the model’s page on Huggingface.
If you’re interested in deploying other models to UbiOps or want more information about how you can optimize your LLM when it’s in production you can have a look at some previous blog posts we wrote:
- Deploy Llama 3
- Reducing inference costs for GenAI
- How to optimize inference speed using batching, vLLM, and UbiOps
- Fine-tune a model on your own documentation
- Creating a front-end for your Mistral RAG
If you’re curious about how UbiOps can help you with deploying & training your AI models, please don’t hesitate to get in touch so we can have a chat about what we can do for you
Appendix
You can upload a model to UbiOps by following these steps, as depicted in the UbiOps documentation:
- Create an environment for the training experiment
- Create an experiment
- Initiate a training run
Create the environment for the training experiment
In UbiOps you can manage the code and the environment it runs in separately. Each environment consists of a base environment (OS, Python version, and/or CUDA version) to which additional dependencies can be added. This will create a custom environment. Environments on UbiOps are docker containers, where experiments and/or deployments run on top of when the instance is started up. Each environment can be reused between different deployments or training experiments, which helps reduce build times.
Environments can be built in two ways:
- Explicitly: by going to the “Environments” tab and creating an environment there
- Implicitly: by adding environment files (requirements.txt and/or ubiops.yaml) to your deployment package. When these files are detected, UbiOps will build an environment for you.
For this blog post, we need to create two environments, one for the experiment and one for the deployment. The environment for the experiment will be built explicitly, while the environment for the deployment will be built implicitly.
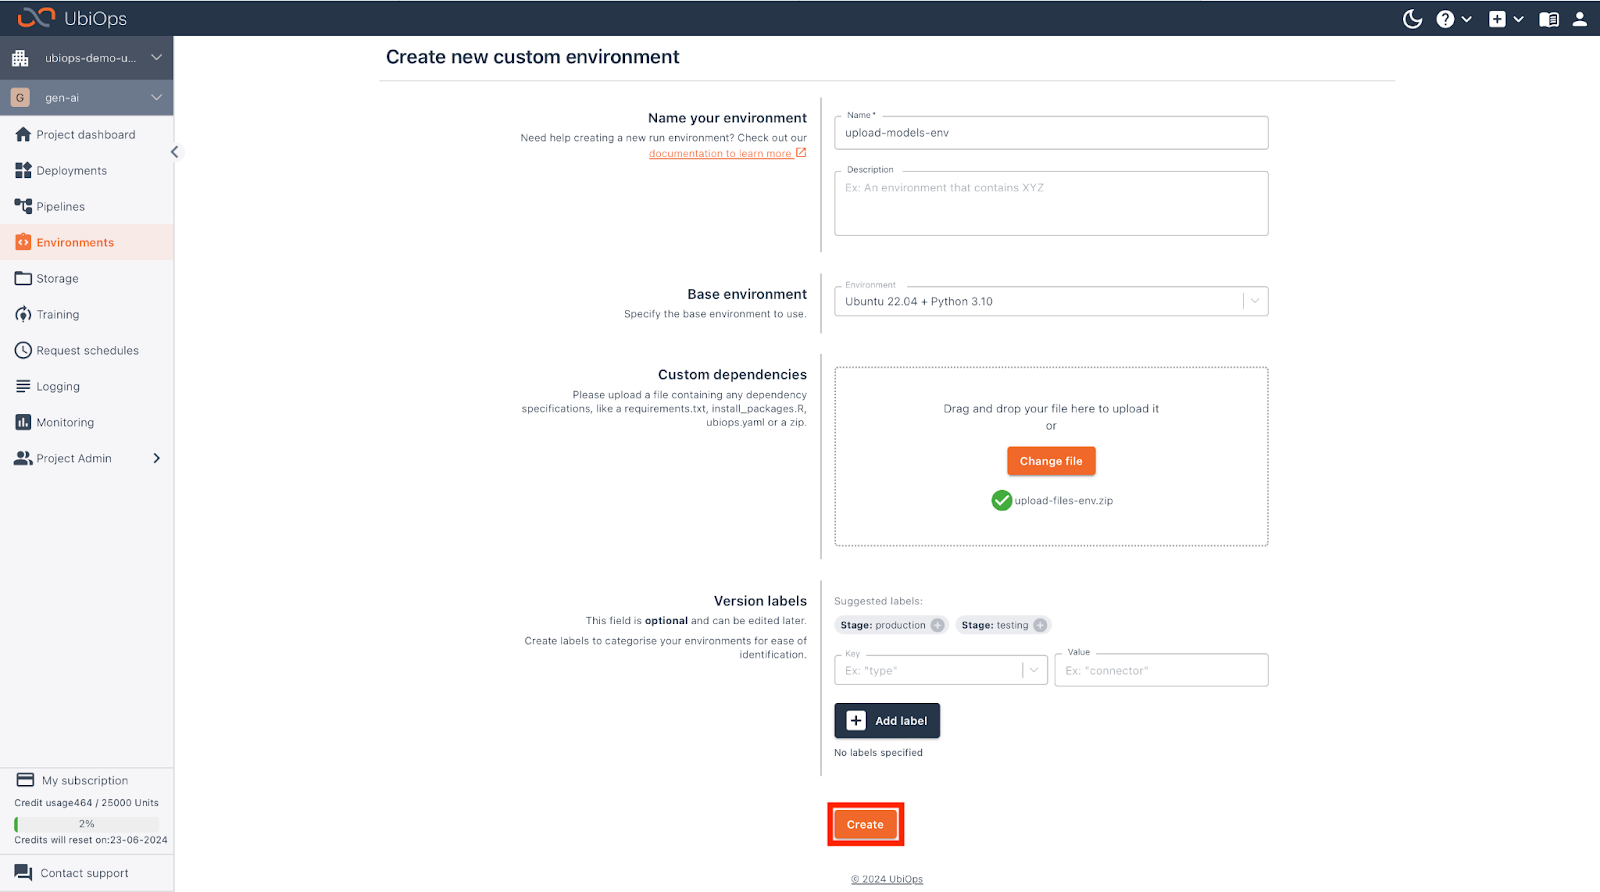
Head over to the “Environments” on the left-hand side, and click on “+ Custom environment”.
There we need to fill in some parameters:
| Field | |
| Name | upload-models-env |
| Base environment | Ubuntu 22.04 + Python 3.10 |
| Custom Dependencies | Download & upload this package |
After filling everything in we can click on the “Create” button below and UbiOps will start building our environment.
Create the experiment
With the environment for the experiment taken care of, we can now create an experiment. Head over to the “Training” tab, which again can be found on the left-hand side and click on “Enable training” if you haven’t already. When enabled, UbiOps will prepare a training setup in your project, in the form of an immutable deployment called training-base-deployment. This deployment will be used to run training experiments and run in the background.
An experiment in UbiOps is where you can define a training setup. Here you can define the environment your training run (the actual code executions) will run in, what instance type you’d like to use, and the default output bucket (the location for any output files). For this blog post we’ll initiate a training run that downloads & uploads the Mistral 7B v0.3 Instruct model to UbiOps. To do this we need to create an API token, which we can then turn into an environment variable.
You can create an API token by navigating to the Project admin page, clicking on Permissions -> API tokens -> “Add token”. Make sure this token is created on “Project level”, and has the “Project editor” role. Copy the token and save it somewhere.
Click on “+ Create new” to create an experiment and fill in the following parameters:
| Field | |
| Name | upload-models |
| Description (optional) | An experiment to upload models to UbiOps |
| Hardware settings | 16384 MB + 4 vCPU |
| Environment settings | Upload-models-env (which we created earlier) |
| Select default output bucket | Default (you can also create your own bucket) |
| Environment variables-> “+ Create environment variable” | Name: UBIOPS_API_TOKEN -> Value: the token you created earlier -> Secret: Yes Name: HF_TOKEN -> Value: your Huggingface access token -> Secret: Yes |
Now you can scroll down and click on “Create”.

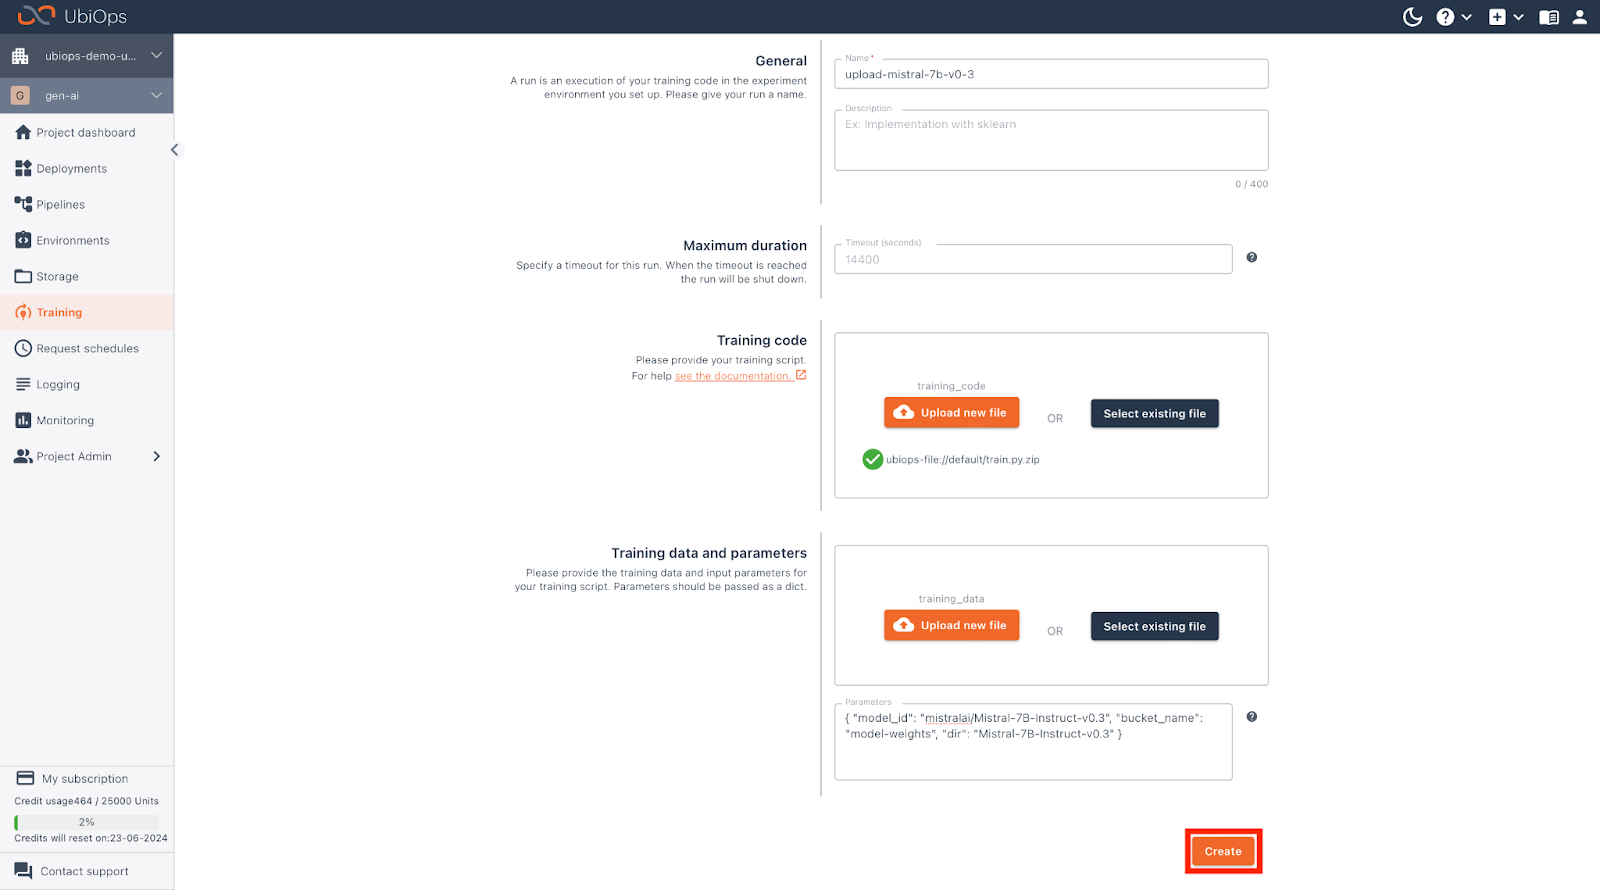
Initiate a training run
After the experiment has finished building, we need to initialize the training run that contains the code to upload the model to UbiOps.
Click on Create run and fill in the following parameters:
| Field | |
| Name | upload-mistral-7b-v0-3 |
| Training code | Upload this file |
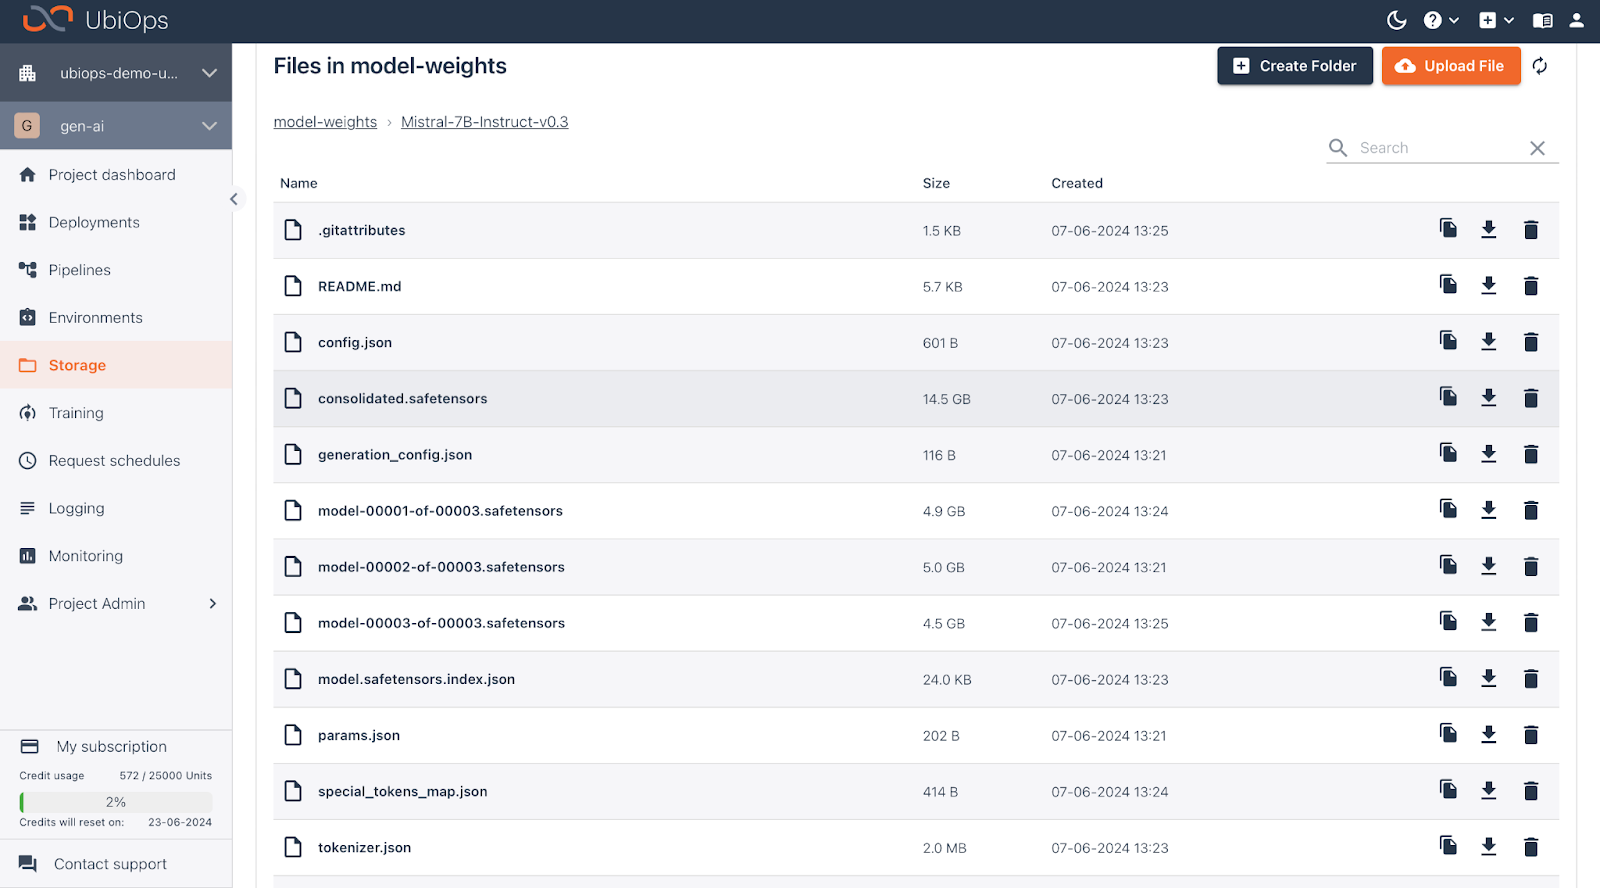
| Parameters | { “model_id”: “mistralai/Mistral-7B-Instruct-v0.3”, “bucket_name”: “model-weights”, “dir”: “Mistral-7B-Instruct-v0.3” } |
Scroll down and click on Create, after which UbiOps will start downloading Mistral-7b-Instruct-v0.3 and upload it to your storage bucket.
After running the code, the model will be uploaded to the bucket specified in the “parameters”: