Download files from Huggingface and upload them to UbiOps
When working with large models, storing its weights on UbiOps ensures that you don’t have to re-download them from Huggingface each time your deployment spins up. It also lets you run models in air-gapped environments and provides control over the specific version you're using.
This guide will show you how to download a model from Huggingface and upload it to UbiOps using a Python script. We will also show how to offload the script to UbiOps using the Training functionality, in case you want to offload the workflows to remote machines, or want to make your workflow repeatable.
If you want to use this method we advise you to create a new bucket inside your project specifically for storing the model weights.
Creating the Python script
The full script to download and upload a model repository to your UbiOps bucket, is provided below. The script connects to the UbiOps API, optionally logs in to Huggingface to access gated repositories, and downloads a model snapshot from Huggingface to a local directory. It then lists the files in the directory and uploads them to a specified UbiOps bucket using the ubiops.utils.upload_files utils method. Finally, the connection to the UbiOps API is closed after the upload is complete.
import os
from pathlib import Path

from huggingface_hub import snapshot_download, login
import ubiops

# Define connection parameters
API_TOKEN = "<INSERT YOUR UBIOPS_API_TOKEN>"
PROJECT_NAME = "<INSERT YOUR PROJECT_NAME>"

# Required to access gated Huggingface repositories
HF_TOKEN = "<INSERT YOUR HUGGINGFACE_TOKEN>"

MODEL_ID = "<INSERT_THE_MODEL_ID>" # Huggingface model ID to download
BUCKET_NAME ="<INSERT_BUCKET_NAME_" # Bucket to which to upload snapshot to
DIR = "<INSERT_YOUR _BUCKET_DIRECTORY" # Directory on bucket to which to upload

# Connect to the UbiOps API
configuration = ubiops.Configuration()
configuration.api_key['Authorization'] = API_TOKEN
configuration.host = "https://api.ubiops.com/v2.1"
api_client = ubiops.ApiClient(configuration)

# Optional: log in to Huggingface, in case you want to access a gated repo
login(HF_TOKEN)

# Download a snapshot of the model's repository
print(f"Downloading snapshot of {MODEL_ID} from Huggingface")
path = snapshot_download(repo_id=MODEL_ID, local_dir=DIR)

file_paths = [os.path.join(os.curdir,file) for file in Path(DIR).iterdir() if file.is_file()]  # List of files to upload
file_prefix = f"{DIR}/"  # Optional: prefix of all files in the bucket
parallel_uploads = 10  # Optional - number of parallel uploads, default - 5

print(f"Uploading {len(file_paths)} files to directory {DIR} in bucket {BUCKET_NAME} in UbiOps project {PROJECT_NAME}")  # Upload list of files

ubiops.utils.upload_files(
    api_client,
    PROJECT_NAME,
    file_paths,
    bucket_name=BUCKET_NAME,
    file_prefix=file_prefix,
    parallel_uploads=parallel_uploads
)


# Close the connection
api_client.close()
Running the script on UbiOps
Now let's have a look at how we can run this process entirely on UbiOps, using the UbiOps Training functionality. Note that in order to follow the steps described in this how-to you'll need to have the training functionallity enabled.
For running this process on UbiOps you need to perform the following steps:
- Create a custom environment for the training run.
- Create a training experiment to set up the training run (the actual code executions).
- Create a training run which will download the files from Huggingface and uploads them to UbiOps.
Creating the custom environment
Before we can create an experiment, we first need to create an environment that contains the correct dependencies. We can do this by selecting a base environment, which we can append with additional dependencies by uploading a requirements.txt.
For this environment you can select Ubuntu 22.04 + Python 3.10 as the base environment. The requirements.txt with the correct dependencies is shown below:
ubiops
huggingface-hub
Creating the experiment
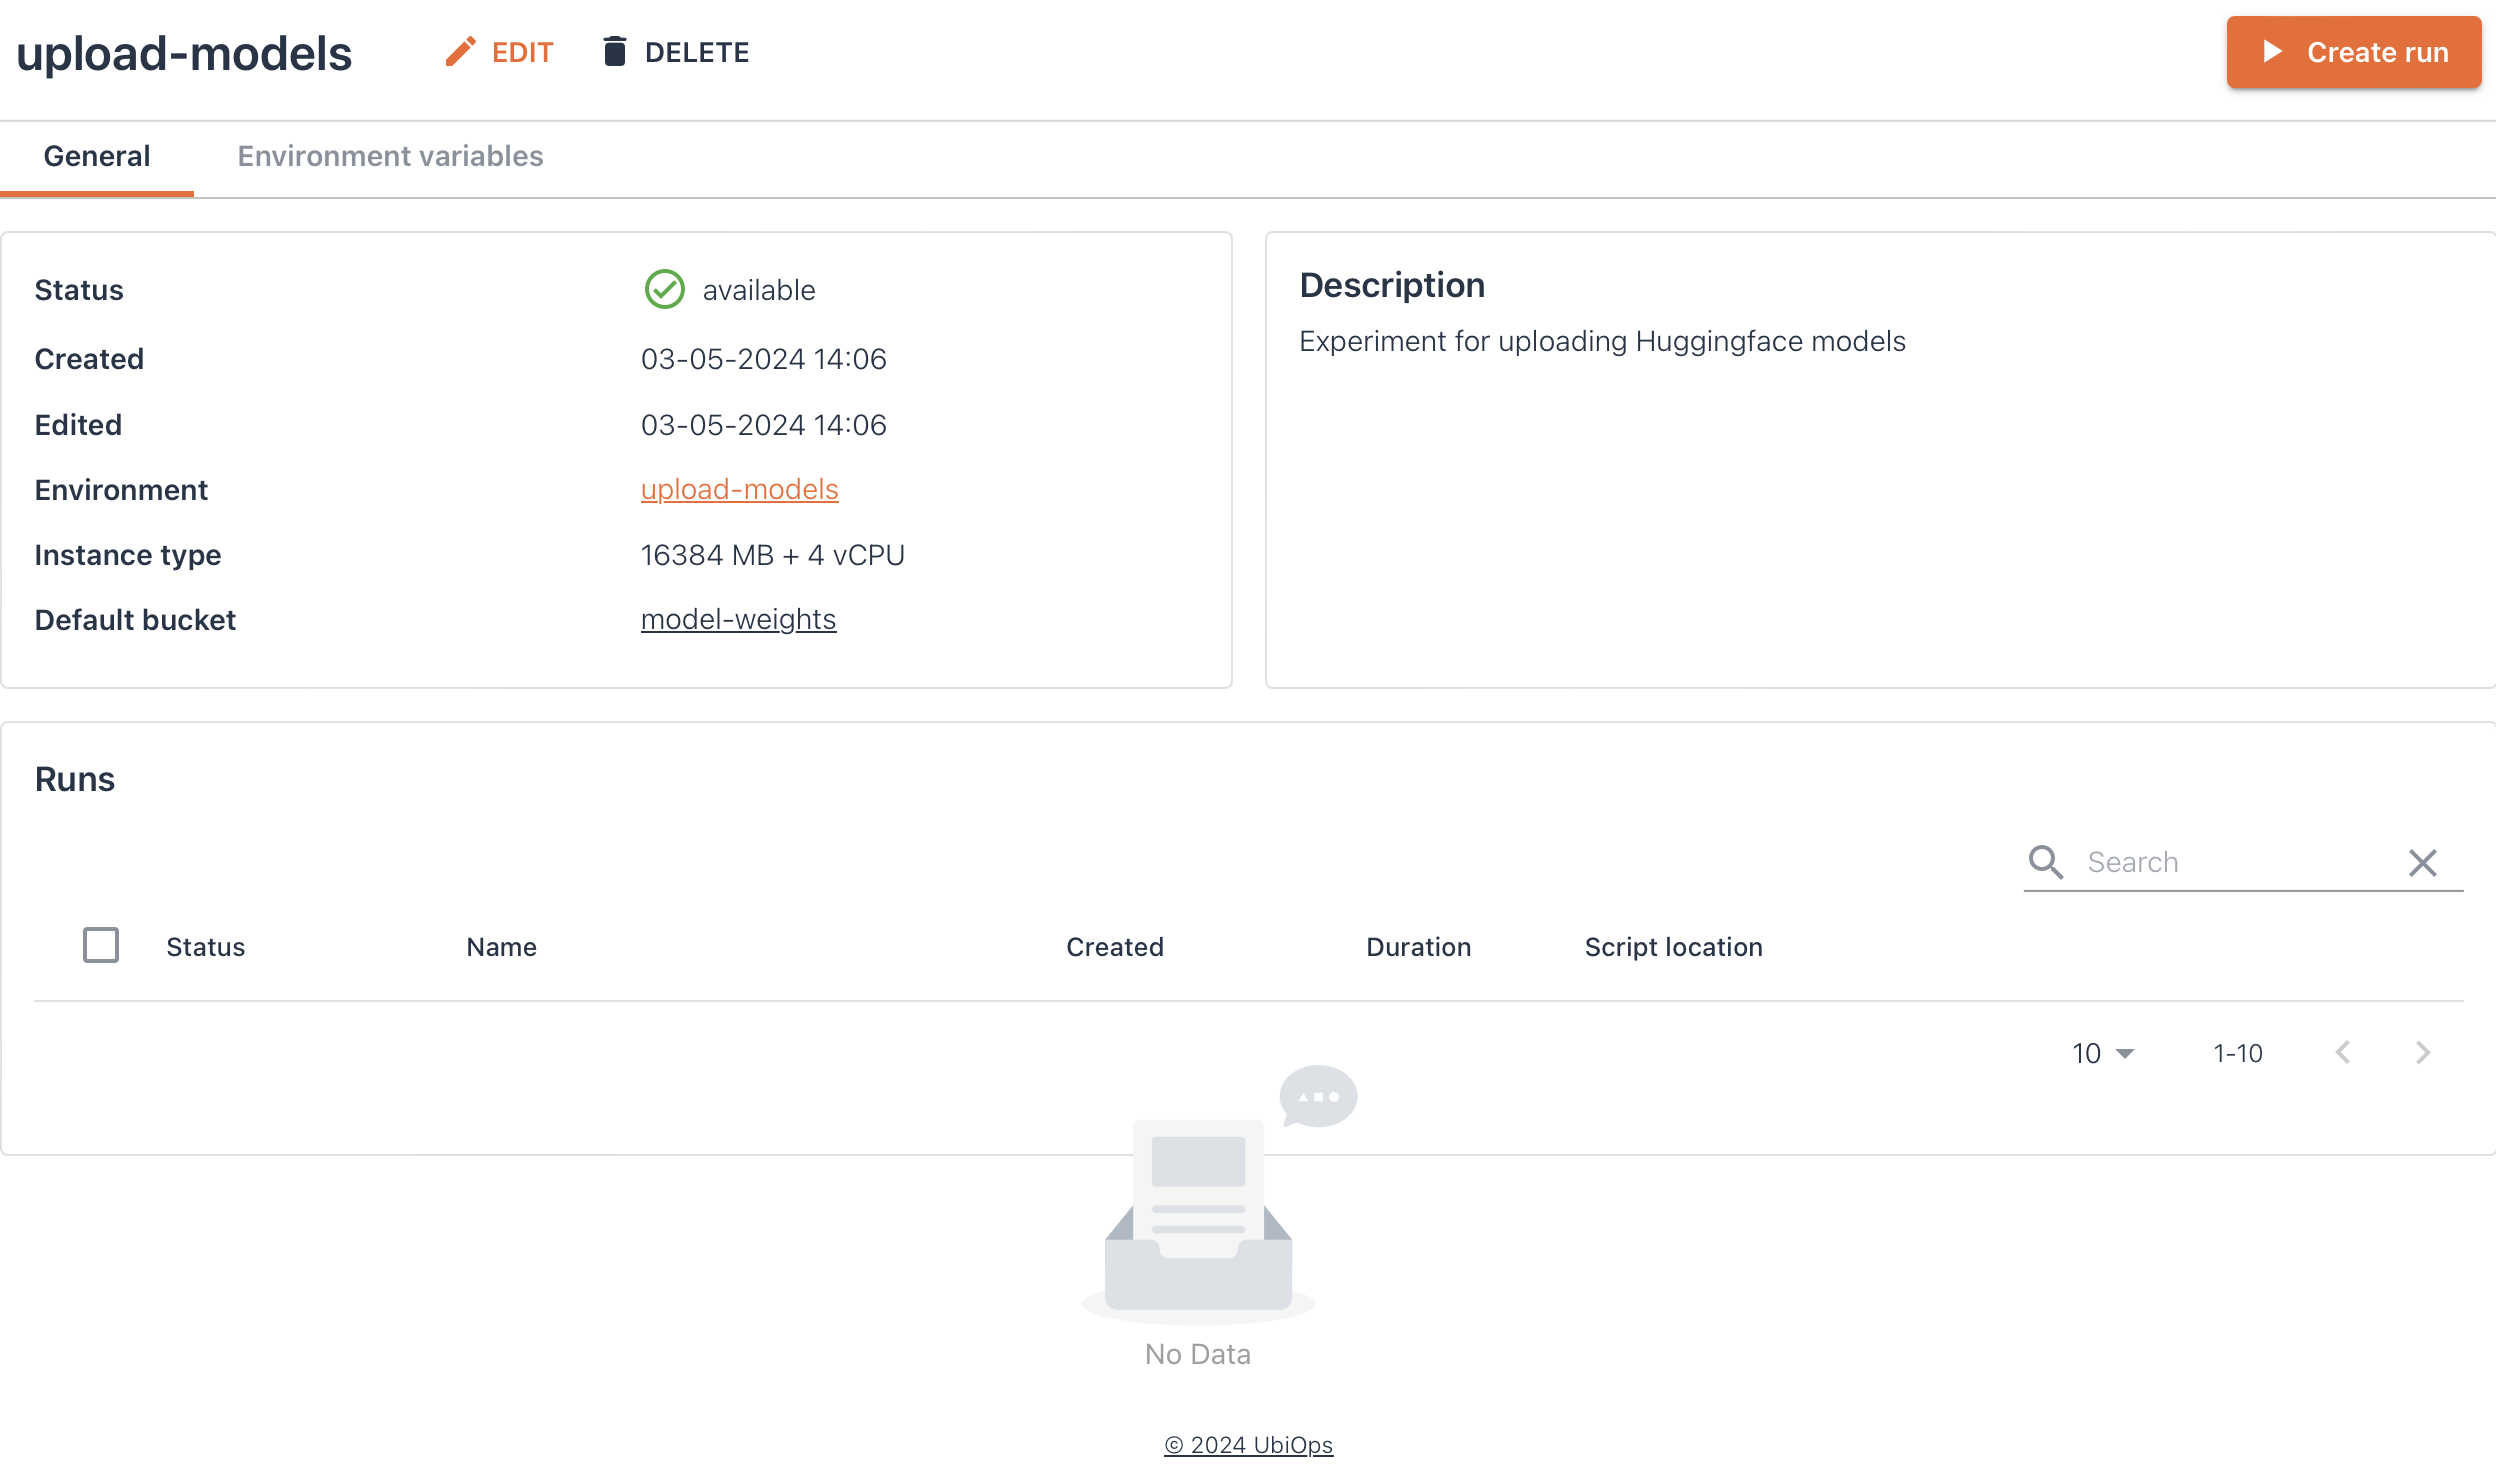
Now that we have our environment set-up it's time to create the experiment. The experiment defines the training set-up used for the training runs, which in this case is going to be downloading the files from Huggingface & uploading them to UbiOps. For the experiment we'll need to define the following parameters:
| Experiment configuration | |
|---|---|
| Name | upload-models |
| Description | Experiment for uploading Huggingface models |
| Hardware settings: | 16384 MB + 4 vCPU |
| Environment settings: | Select the environment you created in the previous step |
| Select default output bucket | Choose which bucket you'd like the model weights stored in here, you can also specify the bucket later as a parameter for the training run |
| Environment variables | Name: PROJECT_NAME, Value: |
| Name: UBIOPS_API_TOKEN , Value: | |
| If the model you want to download has restricted access, you'll also need: | Name: HF_TOKEN , Value: |
Click Create and your experiment will start building!
Click here for an image of how your experiment may look like
Initiate the training run
As final step for this how-to we'll initiate a training run. As mentioned before the training run contains the code that will download the files from Huggingface, and upload them to the Default output bucket you selected when creating the experiment. Note that it's also possible to store the model weights in a different bucket by passing the bucket_name as an input parameter. The code we'll use for the training run is shown below.
For the training run we'll need to specify the following parameters:
| Training run configuration | |
|---|---|
| Name | upload-name of the model you want to upload |
| Maximum duration | For most models the default 14400 seconds is sufficient, for larger models a higher timeout is recommended |
| Training code | Download this file, or copy from below |
| Training data and parameters | Leave as is |
| Parameters | { "model_id": "model_id", "bucket_name": "model-weights", "dir": "model_name" } |
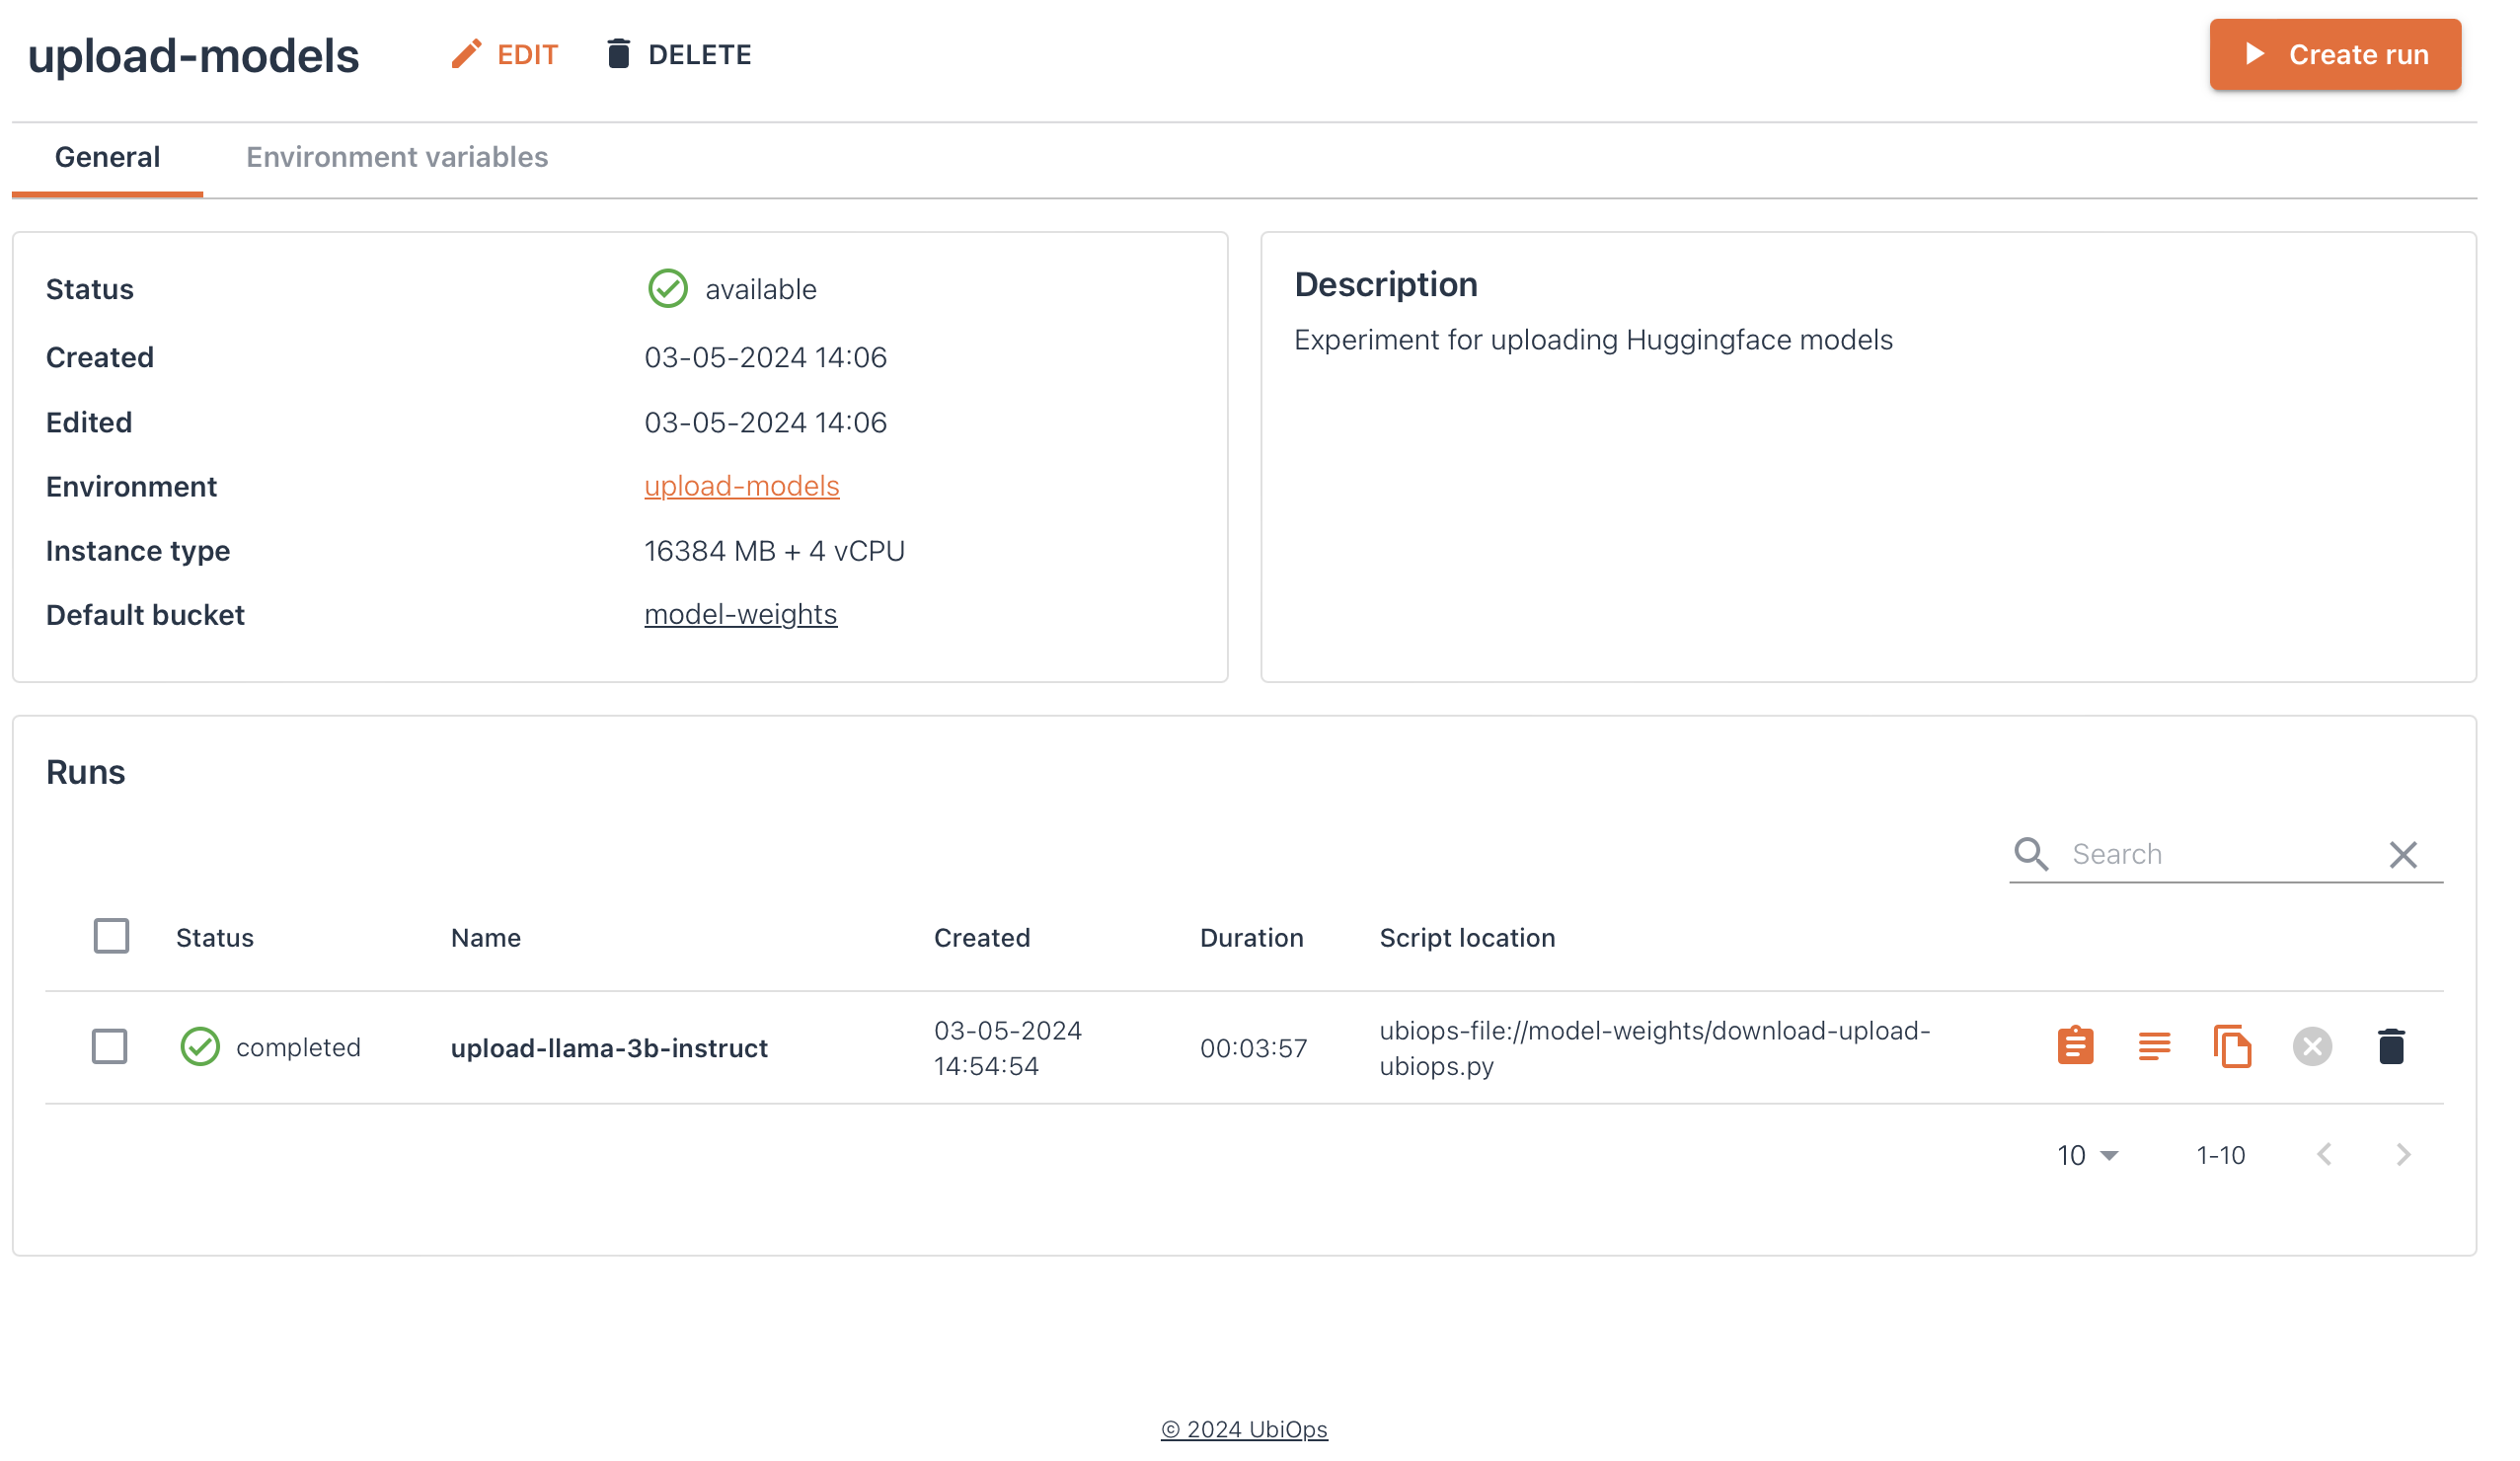
Below you can find an image of an experiment, where the train.py (also shown below) was run to download and upload the files for the Llama-3-8B-Instruct model. For this run the following parameters were used:
{
"model_id":"meta-llama/Meta-Llama-3-8B-Instruct",
"bucket_name":"model-weights",
"dir":"llama-3b-it"
}
Click here to see an image of the experiment with the completed training run
Click here to see the `train.py` which is uploaded to UbiOps
import os
from pathlib import Path

from huggingface_hub import snapshot_download, login
import ubiops

def train(training_data, parameters, context):
    # Define hyperparameters
    API_TOKEN = os.environ["UBIOPS_API_TOKEN"]
    PROJECT_NAME = os.environ["PROJECT_NAME"]
    HF_TOKEN = os.environ["HF_TOKEN"]

    MODEL_ID = parameters["model_id"]  # Huggingface model ID to download
    BUCKET_NAME = parameters["bucket_name"]  # Bucket to which to upload snapshot to
    DIR = parameters["dir"]  # Directory on bucket to which to upload

    # Connect to the UbiOps API
    configuration = ubiops.Configuration()
    configuration.api_key['Authorization'] = API_TOKEN
    configuration.host = "https://api.ubiops.com/v2.1"
    api_client = ubiops.ApiClient(configuration)

    # Optionally log in to Huggingface, in case you want to access a gated repo
    login(HF_TOKEN)

    print(f"Downloading snapshot of {MODEL_ID} from Huggingface")
    path = snapshot_download(repo_id=MODEL_ID,
                             local_dir=DIR)

    # List files in the directory to upload
    file_paths = [os.path.join(os.curdir, file) for file in Path(DIR).iterdir() if file.is_file()]
    file_prefix = f"{DIR}/"  # Optional: prefix of all files in the bucket
    parallel_uploads = 10  # Optional: number of parallel uploads, default - 5

    print(f"Uploading {len(file_paths)} files to directory {DIR} in bucket {BUCKET_NAME} in UbiOps project {PROJECT_NAME}")

    ubiops.utils.upload_files(
        api_client,
        PROJECT_NAME,
        file_paths,
        bucket_name=BUCKET_NAME,
        file_prefix=file_prefix,
        parallel_uploads=parallel_uploads
    )

    print("Finished uploading files")
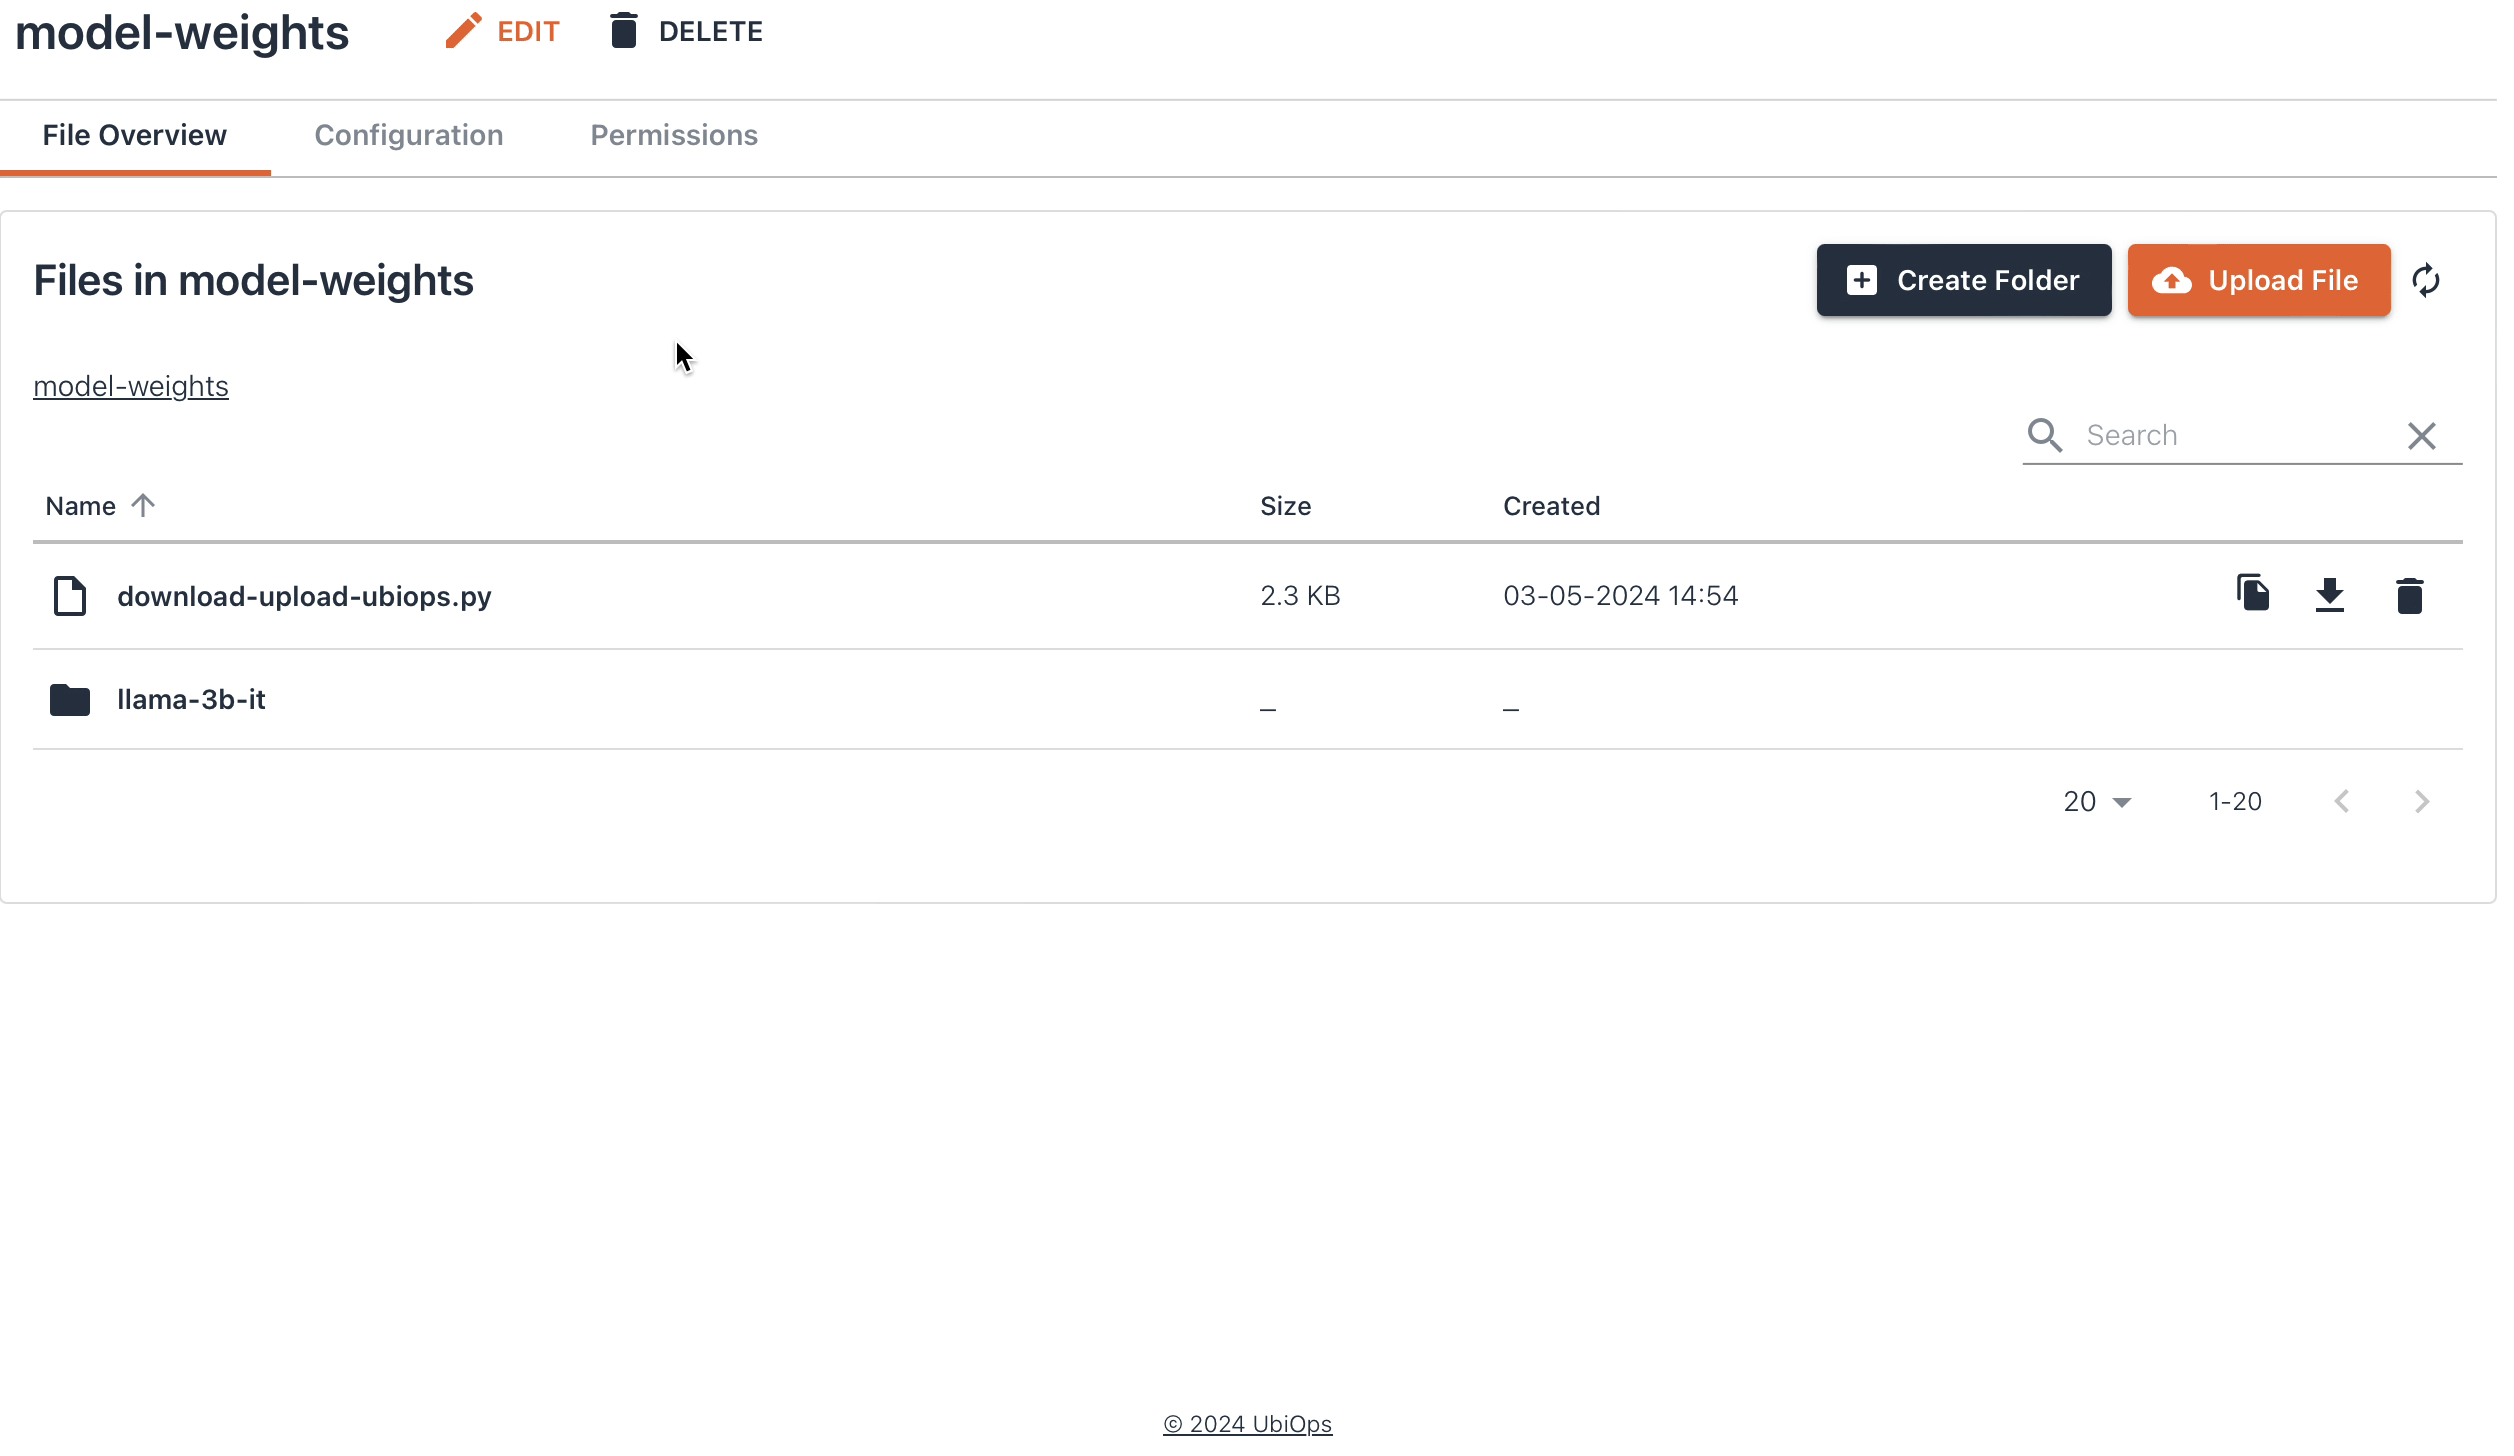
Here's an example of your storage bucket after following all the steps described above: