Fine-tune a model on your own documentation

In this article, we will be creating a chatbot which is fine-tuned on custom documentation. We’ll use UbiOps—which is an AI deployment, serving and management platform—to fine-tune and deploy the instruction-tuned Mistral-7B model taken from Hugging Face. We’ll explain some of the methods used to fine-tune models, such as instruction tuning and domain adaptation, but also some optimization techniques which are a part of the broader field of parameter-efficient fine-tuning (PEFT). We’ll also show how we processed our documentation in order to make it usable for fine-tuning purposes.

What is fine-tuning?

Fine-tuning is a process in which a pre-trained model is re-trained on custom or specific data. A good example of a fine-tuned model is the instruct version of Mistral-7B, which is designed to be a conversational AI, i.e., a chatbot. 

Fine-tuning can be done to simply change a model’s responses using instruction datasets, such as with the instruct versions of Mistral, or to create a more industry-specific model. In this guide we will be creating a UbiOps-specific model which can answer questions about our product. 

Two types of fine-tuning

Lets now discuss the two types of fine-tuning relevant to this article: instruction tuning and domain adaptation. These fall into the category of supervised learning. 

Instruction tuning 

Instruction tuning is a type of fine-tuning in which large language models (LLMs) are judged on their ability to respond to different types of prompts. These prompts are generally in the form of a question, and instruction datasets contain an ideal completion. In our case, the Mistral-7b-instruct-v0.2 is an instruction tuned version of Mistral 7B. MistralAI has not released publicly the specific instruction dataset it used, however, they have stated that they used public instruction datasets available on Hugging Face. Let’s take a standard instruction dataset as an example to understand how instruction tuning works: The HuggingFaceH4 instruction-dataset

Here is a sample of some of its instructions and ideal completions: 

Prompt Completion
Arianna has 12 chocolates more than Danny. Danny has 6 chocolates more than Robbie. Arianna has twice as many chocolates as Robbie has. How many chocolates does Danny have?Denote the number of chocolates each person has by the letter of their first name. We know that A = D + 12 D = R + 6 A = 2 * R Thus, A = (R + 6) + 12 = R + 18 Since also A = 2 * R, this means 2 * R = R + 18 Hence R = 18 Hence D = 18 + 6 = 24
Identify the programming language used to write the given code. Input: if (20 > 18) { printf(“20 is greater than 18”); }C
Write what the pronunciation of the given word sounds like. Follow the “Google pronunciation dictionary” scheme for phonetic spelling. Input: interpretationsin·tr·pruh·tay·shnz
3 examples taken from the instruction-dataset by HuggingFaceH4

As we can see, we have 3 prompt/completion pairs. Instruction tuning involves feeding the LLM these pairs and adjusting its weights and biases based on how close the LLM’s prompt was to the desired completion. 

Domain adaptation

Domain Adaptation is a fine tuning method that is similar to the initial training process. In general, when done in the fine-tuning stage, you will be feeding it a custom or industry-specific textual dataset. In our case, we will be feeding it the UbiOps technical documentation. 

The goal of domain adaptation is to train a model to become knowledgeable in a new field or domain. There are several different ways to do this. However, in its simplest form, you give the model large textual datasets and tune it to predict the next word/token and adjust based on how far off it was in its prediction. 

What is parameter-efficient fine-tuning?

PEFT is a method which is designed to reduce the computational requirements of fine-tuning. With the emergence of LLMs, often having parameters numbering in the tens of billions, having to fine-tune the entire model is expensive. PEFT allows you to fine-tune a smaller set of external parameters. As detailed in LLM-Adapters: An Adapter Family for Parameter-Efficient Fine-Tuning of Large Language Models, PEFT allows you to “capitalize on the remarkable capabilities of backbone models without requiring extensive computational resources.”  

There are several different methods and techniques used to perform PEFT. In our case, we performed a low-ranked adaptation (LoRA)

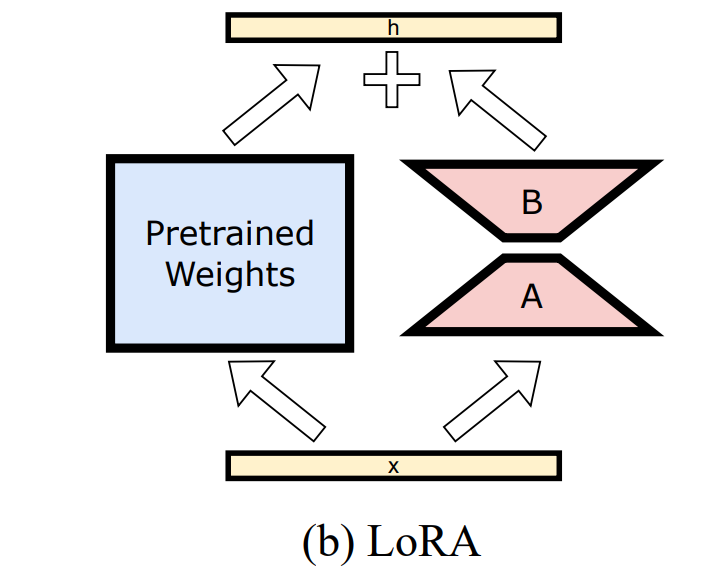
LoRA diagram, source: LLM-Adapters: An Adapter Family for Parameter-Efficient Fine-Tuning of Large Language Models

As shown in the figure above, LoRA “introduces a simple approach to update the parameters of a weight matrix by decomposing it into a product of two low-rank matrices.” This enables you to fine-tune a model faster, as you need to modify a smaller amount of parameters. The two low-rank matrices are the only parameters you will adjust. The output is then combined with the pre-trained matrix, which in our case would be from the Mistral-7b-instruct-v0.2 model. LoRA allows you to use far less computational power as all you need to train are the low-rank matrices.

NOTE: Issues may arise if you perform domain adaptation after instruction tuning. The LLM could “forget” that it’s supposed to be a chatbot and resort to auto-completion. However, we have not encountered any of these issues when performing this experiment. This is because our technical documentation is not very large, numbering around 11 thousand. 

Why should you fine-tune a model? 

Fine-tuning a model can be extremely useful. Here are two reasons why fine-tuning is important:

Firstly, fine-tuning is far less memory and computationally intensive than training a model from scratch, especially using techniques such as LoRA. This fact was detailed in a Harvard Business Review article published in July 2023.

Secondly, fine-tuning can help create a model specific to your needs. In this article, we will be demonstrating a fine-tuned version of Mistral which can answer detailed questions about UbiOps. If you want to download the code and test it immediately, see the Appendix.

How to fine-tune a model?

In our fine-tuning demonstration, we will be using the PEFT library from HuggingFace as well as the UbiOps API. For the training data, we will be using the UbiOps technical documentation.

Choose a base model

As mentioned, our base model is the Mistral-7B-Instruct-v0.2 model which we will retrieve from Hugging Face. 

Create the training data

The next step is to create the training data. As mentioned earlier, we will be fine-tuning the Mistral-7b-instruct-v0.2 model using the UbiOps public documentation. These files, when downloaded, are written in markdown and need to be preprocessed in order to tokenize and feed them correctly to the model. The langchain python library has a method named MarkdownHeaderTextSplitter. We will also be using langchain’s TokenTextSplitter to split the paragraphs into 256 words. You can use any size limit you want but it is dependent on the size of the GPU’s VRAM. We will be using this to split the text into paragraphs:

				
					# Unzip the public documentation and create a list of all files
shutil.unpack_archive("<zipped_data_set>.zip", ".", "zip")
files = glob(f"<unzipped_data_set>/**/*.md", recursive=True)

# split into chunks based on h1 and h2 tags, i.e. the paragraph headers
md_splitter = MarkdownHeaderTextSplitter(
headers_to_split_on=[("#", "h1"), ("##", "h2")], 
strip_headers=False
)
 
    
# Load the tokenizer of the model 
tokenizer = AutoTokenizer.from_pretrained("mistralai/Mistral-7B-Instruct-v0.2")
    
# create a splitter which will be used to split the text into blocks of 256
tok_splitter = TokenTextSplitter(chunk_size=256, chunk_overlap=0)


Then we looped through each file, first splitting the text into paragraphs and then into chunks of 256 characters:

				
					# create an empty list to add the processed text blocks
all_text = list()
    
# loop through each file
for file in tqdm(files):
    # open the file	
    with open(file, 'r') as f:
        # split the text in the file using the Markdown splitter
        cont = f.read()
        md_split = md_splitter.split_text(cont)
            
        # loop through the split up text and split it into blocks of 256 tokens
        for doc in md_split:
            blocks = tok_splitter.split_text(doc.page_content)
                
            # loop through the blocks of 256 tokens and only add to data if larger than 256 tokens. 
            for block in blocks:
                if len(tokenizer.encode(block)) > 256:
                    all_text.append(block.replace('\n', ' ')+tokenizer.eos_token)


It is important to limit the size of each chunk. If left unlimited, it is certain that the VRAM on the gpu would run out. 


Next we will just add all this text to a csv file. We will also upload it to a UbiOps bucket. Click here if you don’t have a UbiOps account. However you can perform this guide locally as well.

				
					# use pandas to create a csv file from the processed text         
res = pd.Series(all_text)
res.to_csv("dataset.csv", index=False)


We have now successfully processed data into 256 token length paragraphs. We can now train the model! 

The fine-tuning process

The fine-tuning process will use several different optimization methods in order to conserve VRAM. Firstly, the model will be quantised. Secondly, we will be using low-rank adaptation (LoRA). Here we will be creating the “train.py” file. You will need to run this file on UbiOps. We will not go into the process from top to bottom, if you want to learn more you can also read this fine-tuning guide. However, we provided the full code in the Appendix.


Let’s first load the model tokenizer and the “dataset.csv” we created. 

				
					# use pandas to create a csv file from the processed text         
res = pd.Series(all_text)
res.to_csv("dataset.csv", index=False)


The DocDataset is a simple class which simplifies length calculation and return from index functions based on the model’s tokenizer:

				
					class DocDataset(Dataset):
    def __init__(self, ds_filename: str, tokenizer, max_length: int):
        self.data = pd.read_csv(ds_filename, index_col=False).sample(frac=1).iloc[:,0]
        self.tokenizer = tokenizer
        self.max_length = max_length

    def __len__(self) -> int:
        return self.data.shape[0]

    def __getitem__(self, idx: int) -> str:
        par = self.data[idx]
        return self.tokenizer(par, truncation=True, max_length=self.max_length)


Next we will define the quantization configurations using the BitsAndBytes class from Hugging Face. 

				
					# quantization config  
quant_config = BitsAndBytesConfig(
    load_in_4bit=True,
    bnb_4bit_quant_type="nf4",
    bnb_4bit_compute_dtype=torch.bfloat16,
    bnb_4bit_use_double_quant=False,
)


Quantization is a method used in machine learning which reduces memory usage. It loads in the parameters in a lower precision, in this case nf4 which means it loads them in as 4 bytes. Normally, it is stored as a bfloat16 meaning 16 bytes. However, it does get converted from nf4 back to bfloat16 during the computation stage, which can be computationally intensive. However it uses around 4 times less memory space. 


Next we configure LoRA using Hugging Face’s LoraConfig method:

				
					# LoRA config
lora_config = LoraConfig(
    r=64,
    lora_alpha=16,
    lora_dropout=0.1,
    bias="none",
    task_type="CASUAL_LM"
) 


Next we will load the quantised model and the PEFT model using Hugging Face’s PEFT library:

				
					# load quantized model
model = AutoModelForCausalLM.from_pretrained(
    "mistralai/Mistral-7B-Instruct-v0.2", 
    device_map="auto",
    quantization_config=quant_config
)
    
# Load the PEFT model
model = get_peft_model(model, lora_config)
# collator to make all inputs the same length
collator = DataCollatorForLanguageModeling(tokenizer, mlm=False)


					trainer = Trainer(
    args=TrainingArguments(
        overwrite_output_dir=True,
        output_dir="<your directory_here>",
        optim="paged_adamw_32bit",
        num_train_epochs=1,  # how many times will the same data be given
        per_gpu_train_batch_size=1  # how many data blocks to give the gpu per training step
    ),
    model=model,
    train_dataset=ds,
    data_collator=collator
)

trainer.train()
trainer.save_model("<your_directory_here>")


We then call the .train() method which commences the fine-tuning process. We have essentially created the “train.py” file which we can run on UbiOps. If you are curious about the process, check out our tutorial about fine-tuning. This entire file can be found in the Appendix. 


What is an epoch in machine learning? An epoch is the number of times the fine-tuning process will re-use the same data. In our case, we will only use it once. 


Why do we use only one epoch? There are some cases, as delineated in Llama 2: Open Foundation and Fine-Tuned Chat Models, where overtraining can lead to overfitting. Meaning that the LLM gets less and less able to respond dynamically to new prompts. However, we encourage you to experiment with different epoch and batch sizes.


Furthermore, it is very useful to combine a fine-tuned model with retrieval-augmented generation (RAG) when creating a customized chatbot based on documentation. It is a useful technique which can avoid model hallucination, meaning generating falsehoods confidently. RAG enables the model to base itself off the relevant document related to the prompt before generating a response. It is a type of prompt engineering. We do not use it in this guide, but you can read our article about implementing RAG for Mistral if you want to learn more.

Call the model

Now we will call the model. We could ask a question such as “How could Harry Potter use UbiOps to defeat Voldemort?”. Here is the response: 


“Harry Potter could use UbiOps to build a predictive model to anticipate Voldemort’s next move based on historical data. He could also use UbiOps to automate the deployment of spells or potions, allowing him to focus on strategic planning. Additionally, UbiOps could help Harry and his friends analyze large amounts of data from various sources, such as the Ministry of Magic or Hogwarts Library, to gain insights and make informed decisions.”

Conclusion

To summarize, we went over several fine-tuning techniques, specifically instruction tuning and domain adaptation. We then explained adaptation methods, specifically LoRA, which are part of PEFT. We then showed some of the data pre-processing techniques we used in Python. We then showed some quantization methods and how to perform LoRA using Hugging Face’s library. We then showed the model in action. Having a custom chatbot is incredibly useful. It is very easy to update and re-perform the process when a new pre-trained model is released. Fine-tuning is one of the most efficient ways to have your own personalized model. Thanks for reading!


Appendix

Pre-processing code for the documentation

				
					from glob import glob
import shutil

from langchain.text_splitter import TokenTextSplitter, MarkdownHeaderTextSplitter
from transformers import AutoTokenizer
from tqdm import tqdm
import pandas as pd
import ubiops 


def train(trainikg_data, parameters, context = {}):
    configuration = ubiops.Configuration()
    api_client = ubiops.ApiClient(configuration)
    file_uri = ubiops.utils.download_file(
      client = api_client, #a UbiOps API client, 
      project_name=context["project"], 
      output_path = ".",
      bucket_name= "default",
      file_name= "dataset.zip"
    )
    shutil.unpack_archive("dataset.zip", ".", "zip")
    files = glob(f"public-docs/**/*.md", recursive=True)

    md_splitter = MarkdownHeaderTextSplitter(headers_to_split_on=[("#", "h1"), ("##", "h2")], strip_headers=False)
    tokenizer = AutoTokenizer.from_pretrained(parameters["model_name"])
    tok_splitter = TokenTextSplitter(chunk_size=parameters["max_length"], chunk_overlap=0)

    alltext = list()
    for fname in tqdm(files):
        with open(fname, 'r') as f:
            cont = f.read()
            md_split = md_splitter.split_text(cont)
            for doc in md_split:
                blocks = tok_splitter.split_text(doc.page_content)
                for block in blocks:
                    if len(tokenizer.encode(block)) > parameters["min_length"]:
                        alltext.append(block.replace('\n', ' ')+tokenizer.eos_token)

    res = pd.Series(alltext)
    res.to_csv("dataset.csv", index=False)
    ubiops.utils.upload_file(
      client = api_client, #a UbiOps API client, 
      project_name=context["project"], 
      file_path = "dataset.csv",
      bucket_name= "default",
      file_name= "dataset.csv"
    )


    return {}


Fine-tuning code

				
					import shutil

from transformers import Trainer
from transformers import DataCollatorForLanguageModeling
from transformers import AutoModelForCausalLM 
from transformers import TrainingArguments
from transformers import BitsAndBytesConfig
from transformers import AutoTokenizer
from peft import LoraConfig, get_peft_model
import torch
import ubiops
import pandas as pd
from torch.utils.data import Dataset
from langchain.text_splitter import TokenTextSplitter, MarkdownHeaderTextSplitter

from dsload import DocDataset
 
class DocDataset(Dataset):
    def __init__(self, ds_filename: str, tokenizer, max_length: int):
        self.data = pd.read_csv(ds_filename, index_col=False).sample(frac=1).iloc[:,0]
        self.tokenizer = tokenizer
        self.max_length = max_length

    def __len__(self) -> int:
        return self.data.shape[0]

    def __getitem__(self, idx: int) -> str:
        par = self.data[idx]
        return self.tokenizer(par, truncation=True, max_length=self.max_length)

def train(trainikg_data, parameters, context = {}):
    configuration = ubiops.Configuration()
    api_client = ubiops.ApiClient(configuration)
    file_uri = ubiops.utils.download_file(
      client = api_client, #a UbiOps API client, 
      project_name=context["project"], 
      output_path = ".",
      bucket_name= "default",
      file_name= "dataset.csv"
    )
    tokenizer = AutoTokenizer.from_pretrained(parameters["model_name"])
    tokenizer.pad_token_id = tokenizer.eos_token_id
    ds = DocDataset("dataset.csv",tokenizer, parameters["max_length"])

    quant_config = BitsAndBytesConfig(
        load_in_4bit=True,
        bnb_4bit_quant_type="nf4",
        bnb_4bit_compute_dtype=torch.bfloat16,
        bnb_4bit_use_double_quant=False,
    )
    
    #nf4_config = BitsAndBytesConfig(load_in_4bit=True, bnb_4bit_quant_type="nf4")
    
    lora_config = LoraConfig(
                    r=64,
                    lora_alpha=16,
                    lora_dropout=0.1,
                    bias="none",
                    task_type="CASUAL_LM"
                    )
    
    model = AutoModelForCausalLM.from_pretrained(parameters["model_name"], device_map="auto", quantization_config=quant_config)
    
    model = get_peft_model(model, lora_config)
    collator = DataCollatorForLanguageModeling(tokenizer, mlm=False)
    
    trainer = Trainer(
                args=TrainingArguments(
                    overwrite_output_dir = True,
                    output_dir = "tuned", 
                    optim="paged_adamw_32bit",
                    num_train_epochs=1,
                    per_gpu_train_batch_size=1),
                model=model,
                train_dataset=ds,
                data_collator=collator
            )
    trainer.train()
    trainer.save_model("./adapter_weights")
    shutil.make_archive("adapter_weights", "zip", "adapter_weights")

    ubiops.utils.upload_file(
      client = api_client, #a UbiOps API client, 
      project_name=context["project"], 
      file_path = "adapter_weights.zip",
      bucket_name= "default",
      file_name= "adapter_weights.zip"
    )


Latest news

Turn your AI & ML models into powerful services with UbiOps