A new file system in UbiOps
We recently released a new file system at UbiOps, which makes it a lot easier to work with files on the UbiOps platform. To show you how the new system works I will walk you through an example. In the last release we changed our file system from working with hidden blobs, to a proper file management system where you can visually manage your files in storage buckets. The new system also made it possible to work with much bigger files than before.
In this example we will train a tensorflow model on UbiOps that aims to predict the primary type of a pokemon based on its image! “Is that even possible?” you might ask yourself. And honestly, I asked that same question myself too. Let’s just say I’m happy this article is about showcasing how to work with files on UbiOps, and not about optimizing accuracy of a tensorflow model! I will discuss the following steps:
- Preparing the dataset
- Preparing a storage bucket
- Preparing a training deployment
- Creating a training run
Without further ado, let’s get on with it shall we?
Preparing our training dataset
I took this Kaggle pokemon dataset from Vishal Subbiah as a starting point for this tutorial. It contains image sprites from pokemon of the first seven generations, and a csv file which contains the types of these pokemons.
Since we’ll be working with TensorFlow for this tutorial, we still need to adjust this dataset to be in a format that Tensorflow can understand. Tensorflow has a really handy function for creating image datasets: tf.keras.utils.image_dataset_from_directory. This function expects the directory to have the following structure:
main_directory/
...class_a/
......a_image_1.jpg
......a_image_2.jpg
...class_b/
......b_image_1.jpg
......b_image_2.jpg
To get the Kaggle dataset to look like this we can use the following code snippet:
import shutil
import os
import pandas as pd

# Path to the downloaded kaggle dataset from https://www.kaggle.com/datasets/vishalsubbiah/pokemon-images-and-types
filename = "archive.zip"

# Target directory
extract_dir = "./data/pokemon_images"

# Format of archive file
archive_format = "zip"

# Unpack the archive file
shutil.unpack_archive(filename, extract_dir, archive_format)

df = pd.read_csv('./data/pokemon_images/pokemon.csv')

# Function that maps a pokemons name to its associated primary type
def name_to_type(name):
  pokemon_type = df.loc==name]['Type1'].values[0]
  return pokemon_type

# Preparing dataset for tensorflow
source_dir = './data/pokemon_images/images/'
for root, subFolders, files in os.walk(source_dir):
  for file in files:
      classname = name_to_type(file[:-4])
      subFolder = os.path.join(source_dir, classname)
      if not os.path.isdir(subFolder):
          os.makedirs(subFolder)
      shutil.move(os.path.join(root, file), subFolder)
What I’m doing in this code is mapping each pokemon image to its corresponding primary type according to the csv, and moving the image to a new subfolder which is named after that type. After running this piece of code, you should see a new directory called “data” which looks like this:

A last step in preparing our dataset for use in UbiOps is to zip the pokemon_images folder.
Preparing a storage bucket for training
Now that we have our dataset prepared, we can start getting it ready for use on UbiOps. Files in UbiOps are managed in “buckets”. So let’s make a new bucket specifically for anything training related.
When adding a new bucket you have two options:
- Create a new bucket hosted by UbiOps on Google
- Connect to an existing bucket on your own infra (AWS, Azure, Google)
For this example I’m simply creating a new UbiOps bucket, but in an actual training scenario you might already have an S3 bucket where you store datasets and then it would make more sense to connect to that.
I create a new bucket called ‘training’ and upload my zipped pokemon images dataset to this bucket.

Preparing a training deployment
The code
Now that our data is fully ready, we can start writing some code to train a Tensorflow model on it! The code structure I follow is based on Tensorflow’s recommendations for a classification set-up, and can be seen below. Essentially it follows three steps:
- Load the data and split it into a train and validation set
- Define the network architecture
- Train the model on the data and evaluate
To be able to see the progression of the training run visually as well I also added some code to make a plot of the loss and accuracy development over the epochs.
import numpy as np
import tensorflow as tf
import joblib
import matplotlib.pyplot as plt
import shutil


class Deployment:

    def __init__(self, base_directory, context):
        # Any code inside this method will execute when the deployment starts up.
        print('Deployment initializing...')

    def request(self, data, context):
        # Set training parameters
        batch_size = 32
        img_height = 120
        img_width = 120
        nr_epochs = data['nr_epochs'] # It is an input parameter to the deployment

        # Load the training data
        filename = data['training_data'] # The file will be passed as input to the deployment
        extract_dir = "./training-data/"
        shutil.unpack_archive(filename, extract_dir, "zip")

        # Prepare tensorflow image datasets
        data_dir = './training-data/pokemon_images/images'

        train_ds = tf.keras.utils.image_dataset_from_directory(
          data_dir,
          validation_split=0.2,
          subset="training",
          seed=123,
          image_size=(img_height, img_width),
          batch_size=batch_size)

        val_ds = tf.keras.utils.image_dataset_from_directory(
          data_dir,
          validation_split=0.2,
          subset="validation",
          seed=123,
          image_size=(img_height, img_width),
          batch_size=batch_size)

        class_names = train_ds.class_names
        print(f"found the following class names: {class_names}")

        nr_epochs = data['nr_epochs']

        normalization_layer = tf.keras.layers.Rescaling(1./255)
        normalized_ds = train_ds.map(lambda x, y: (normalization_layer(x), y))
        image_batch, labels_batch = next(iter(normalized_ds))

        # Configure the dataset for performance
        AUTOTUNE = tf.data.AUTOTUNE
        train_ds = train_ds.cache().prefetch(buffer_size=AUTOTUNE)
        val_ds = val_ds.cache().prefetch(buffer_size=AUTOTUNE)

        # Train the model
        num_classes = len(class_names)

        data_augmentation = tf.keras.Sequential(

        )

        model = tf.keras.Sequential()

        model.compile(
          optimizer='adam',
          loss=tf.losses.SparseCategoricalCrossentropy(from_logits=True),
          metrics=['accuracy'])

        history = model.fit(
          train_ds,
          validation_data=val_ds,
          epochs=nr_epochs
        )

        # Evaluate
        eval_res = model.evaluate(val_ds)

        acc = history.history['accuracy']
        val_acc = history.history['val_accuracy']

        loss = history.history['loss']
        val_loss = history.history['val_loss']

        epochs_range = range(nr_epochs)

        # Some extra plots for tracking loss and accuracy changes
        plt.figure(figsize=(8, 8))
        plt.subplot(1, 2, 1)
        plt.plot(epochs_range, acc, label='Training Accuracy')
        plt.plot(epochs_range, val_acc, label='Validation Accuracy')
        plt.legend(loc='lower right')
        plt.title('Training and Validation Accuracy')

        plt.subplot(1, 2, 2)
        plt.plot(epochs_range, loss, label='Training Loss')
        plt.plot(epochs_range, val_loss, label='Validation Loss')
        plt.legend(loc='upper right')
        plt.title('Training and Validation Loss')
        plt.savefig("training_run.png")

        # Return the trained model file and metrics
        joblib.dump(model, 'model.pkl')
        fin_loss = eval_res[0]
        fin_acc = eval_res[1]
        run_id = context['id']

        return {
          'model_file': { 'file':'model.pkl', 'bucket':'training', 'bucket_file': f'{run_id}/model.pkl'},
          'loss_and_accuracy_plot': { 'file':'training_run.png', 'bucket':'training', 'bucket_file': f'{run_id}/accuracy_and_loss.png'},
          'loss': fin_loss,
          'accuracy': fin_acc
        }
Creating the deployment
To create a deployment based on the code from the previous section I simply need to zip everything and specify my deployment settings. When creating a deployment UbiOps will turn our code into a scalable microservice with its own API.
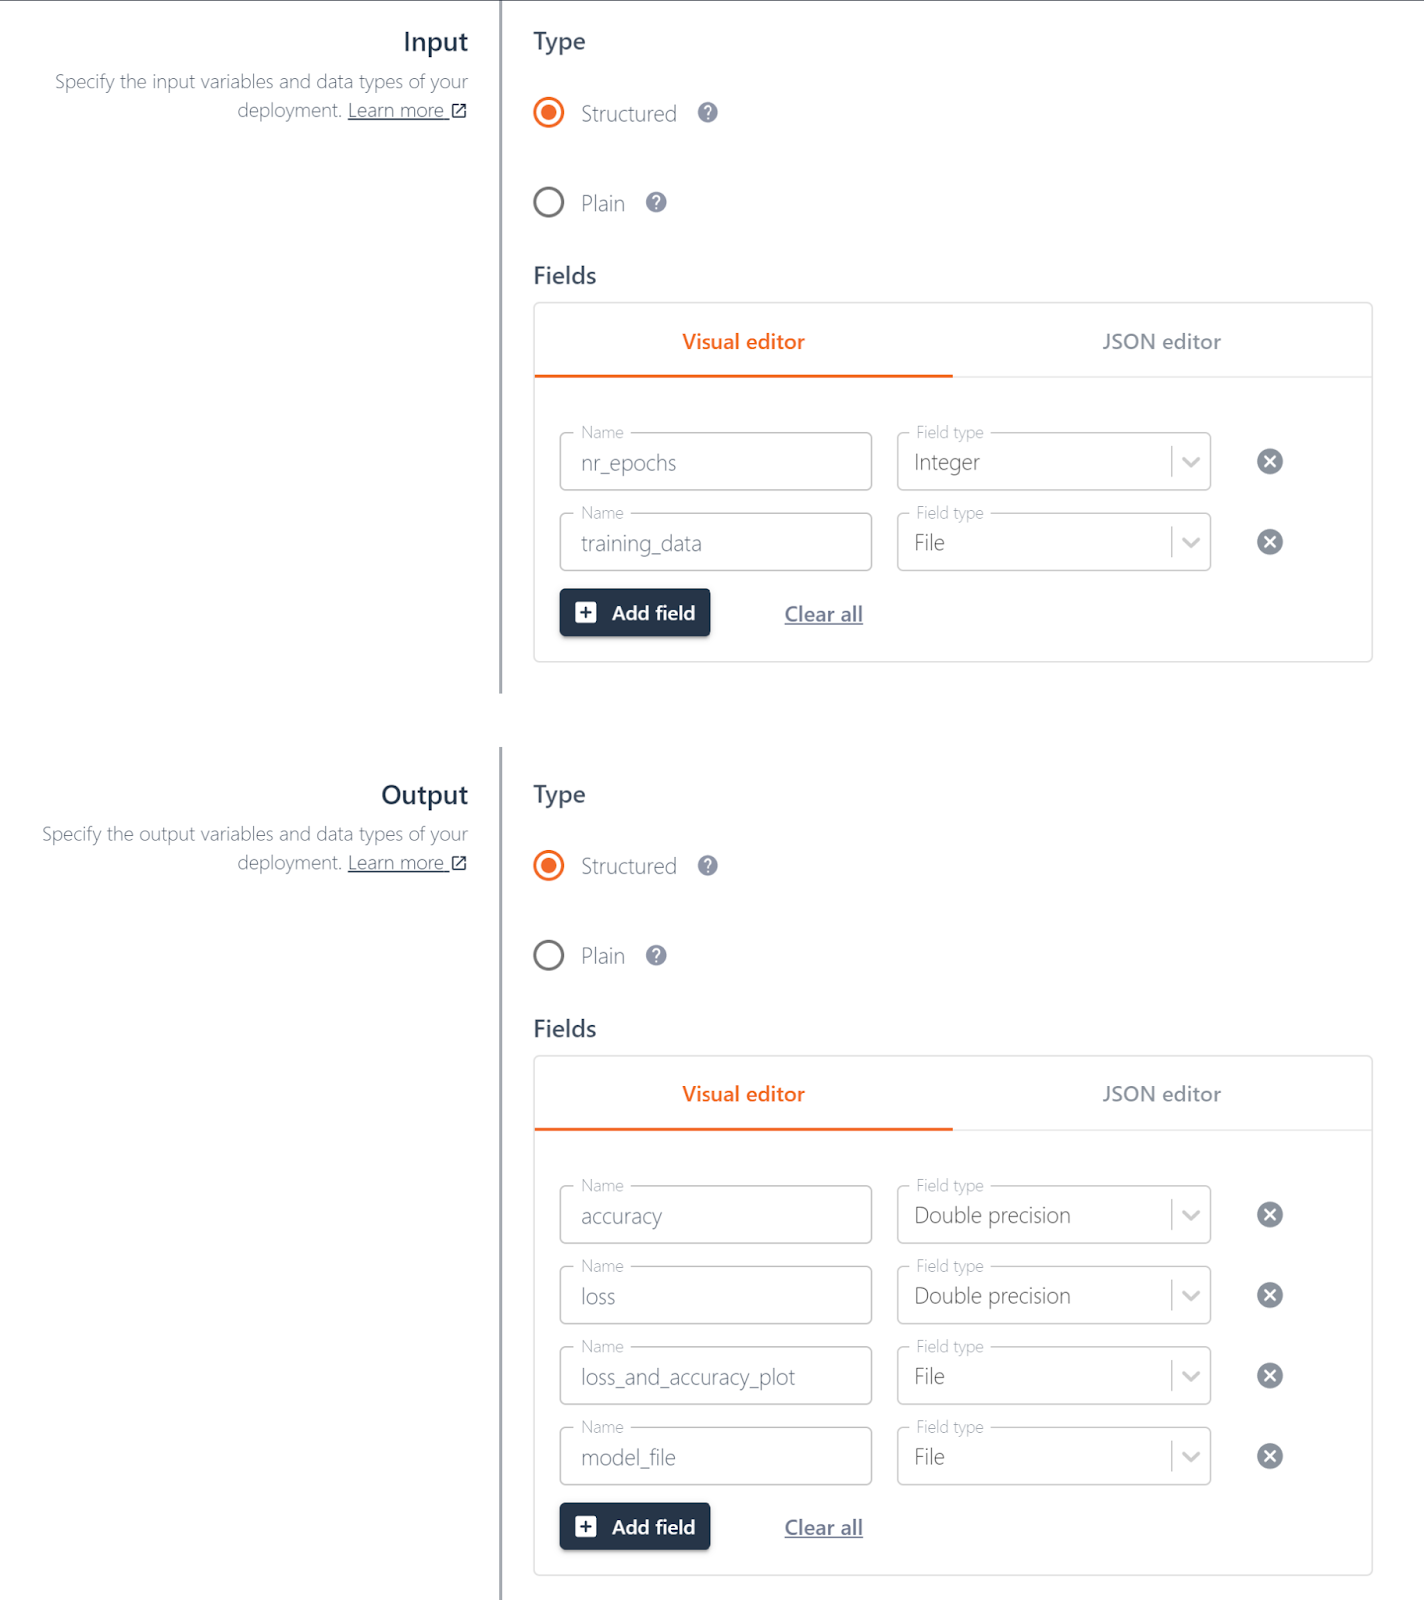
First we need to create a new deployment with the following settings:
- Name: pokemon-training-job
- Input:
- nr_epochs : integer
- training_data : file
- Output:
- accuracy: double precision
- loss : double precision
- loss_and_accuracy_plot : file
- model_file : file
- Bucket permissions:
- You need to give the deployment “files-writer” permissions on your previously created “training”bucket. Otherwise the deployment will not be able to access the dataset!
Afterwards we can create the deployment version that will contain our training code. I use the following settings:
- Name: v1
- Language: Python 3.8
- Deployment package: the zip file we created in the previous section
- All the other settings I left on their defaults
After creation the deployment version will first start building. Once it has status available we can actually trigger a training run through a request.
Creating a training run
We now have everything in place to create a training run. To do so we simply need to send a request which contains our dataset and extra parameters as input. Just click “create request” and fill in the input accordingly:

After clicking “create direct request” the training run will be started.
Depending on the number of epochs, the training run can take a while. You can turn on notifications for when the request is finished, this way you can continue with other things in the meantime. To turn on these notifications, simply head to the requests tab of your deployment version and click the little orange bell icon of the processing request.

Wrapping up
The accuracy of this specific model is fairly low, as I haven’t done much in terms of hyperparameter tuning. I did find that it works fairly well for specific pokemon types, like fire or water, but it has very poor results for types like “ghost”. The reason for this is of course also that perhaps the primary type isn’t inherently related to the pokemons visual appearance. Typically fire pokemon are red and water pokemon are blue, but especially with the later generations this stereotype was challenged. Regardless of the model performance, I hope that I could give you an idea of how you can train a tensorflow model on UbiOps with the new file system!
Training with GPUs instead?
No worries there! You can also run your deployments on GPUs. Simply reach out to sales to get access to GPUs in your project.


