What is CI/CD?
CI/CD is an important DevOps practice and an Agile methodology best practice. The idea of CI/CD is that new code changes should be continuously integrated into the existing code base and checked if they work as intended. If all the changes pass all checks it should be delivered or deployed. CI/CD pipelines are set-ups that allow teams to frequently deliver and deploy their application. It automates repetitive tasks so you can focus on making the actual changes and implementing new features.These CI/CD pipelines are often set up in the version control systems that a team uses, like GitLab or GitHub, or via specialized tools like Jenkins. In this article I’ll use GitLab because it’s so widely used and their built-in CI/CD pipeline features are very easy to use. If you want to know more about CI/CD and its benefits I recommend reading this article by The Educative team.Setting up your CI/CD pipeline
In the following sections I will walk you through making a CI/CD pipeline that automatically deploys a model to UbiOps whenever new changes have been merged to the master branch.Some preparations
To make this example work we need to have two things ready: an initial deployment in UbiOps , a UbiOps API token, and the code for our deployment in a GitLab repo. I will just use the basic multiply example from the UbiOps quickstart, but you can use any deployment you want. The deployment package contents need to be hosted on your repo on GitLab. For the API token we need to head over to the UbiOps WebApp, go to our project and then head over to Permissions in the sidebar. On the permissions page we need to navigate to the API tokens tab. Here you can click the [+]Add button to create a new API token. Give the new token a name, for instance “git-token”. You will be prompted to add roles to the token. Click on the [+]Assign roles to user button and select deployment-editor from the drop-down menu. You can set the role level on Deployment and select the specific deployment you want to control with Git CI in the Applied to field. Lastly, copy the API token and save it in a secure spot! You will not be able to retrieve this token again.
Giving GitLab the rights to push to UbiOps
We need to add the API token we created in the previous step to GitLab to give GitLab the rights to push to UbiOps. To do that we need an environment variable. We can create one by navigating to Settings, then clicking on the tab CI/CD and then going to variables. Name the variable UBIOPS_TOKEN and paste the saved API token as value in the format “Token abcd123”. For more information on GitLab variables see here.Creating the gitlab-ci.yml
Now that the token is added as a variable to your repository, we can make a gitlab-ci.yml that pushes the code from our GitLab repository to UbiOps. In essence the yaml should do the following:- Only runs when it concerns changes to the master branch
- It sets up a connection with UbiOps and initializes the UbiOps CLI
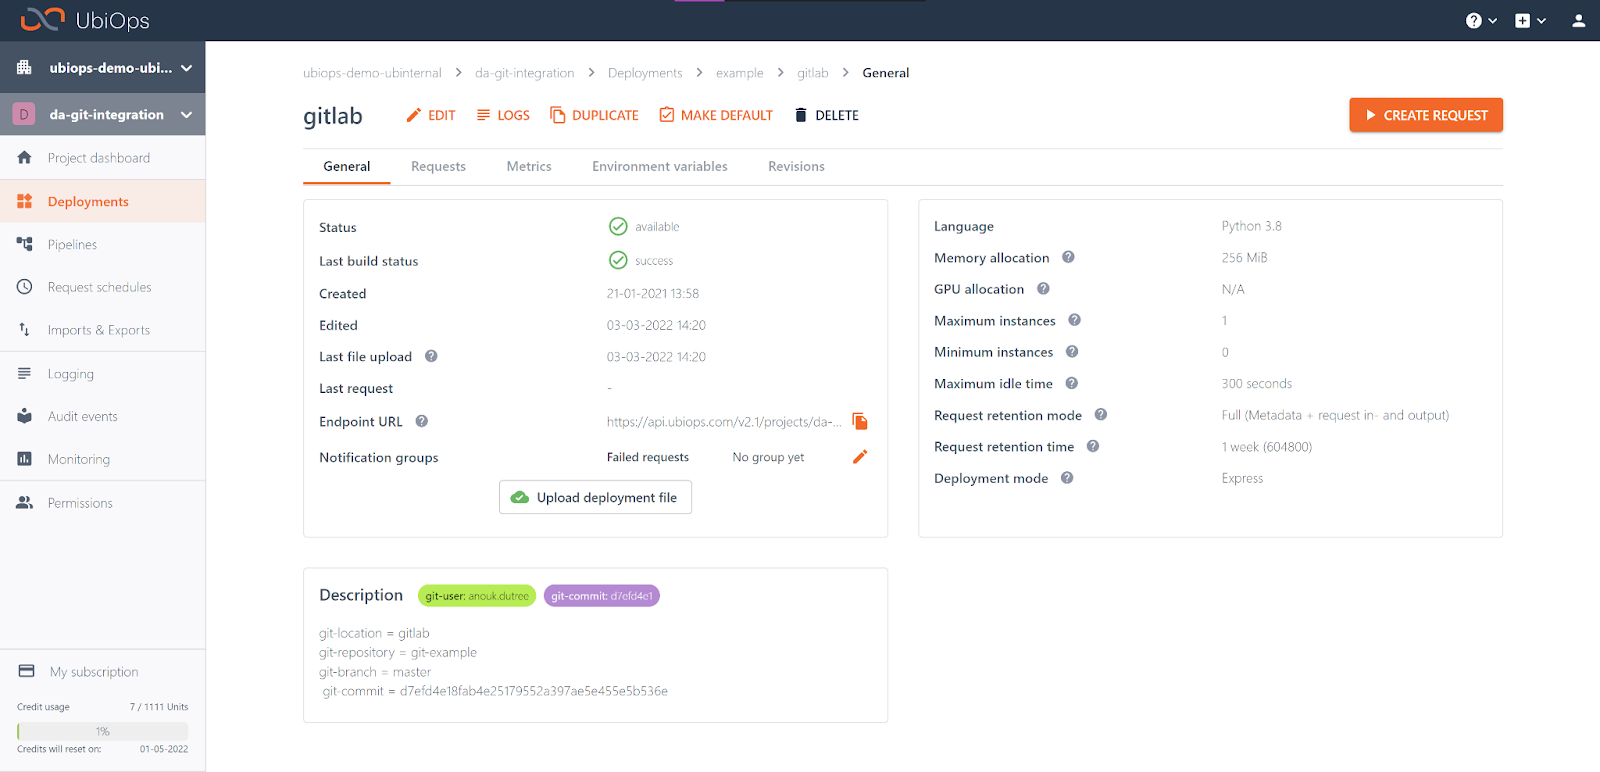
- It deploys the deployment code to UbiOps while tracking which commit and which user triggered the rebuild
stages:

  - deploy
deploy:
  stage: deploy
  image: python:3.8
  variables:
    # Below are the parameter settings of your UbiOps deployment
    DEPLOYMENT_NAME: <your-deployment-name>
    VERSION_NAME: <your-version>
    # Version specific parameters
    LANGUAGE: python3.8
    # The path to your deployment package in your repository
    DIR_PATH: ./path/to/deployment-package
  before_script:
    - pip install ubiops-cli
    # Authorize the CLI using an API token
    - ubiops signin --token -p "${UBIOPS_TOKEN}"
  script:
    # Deploy your new deployment package to UbiOps using the CLI
    - ubiops dpl deploy ${DEPLOYMENT_NAME} -v ${VERSION_NAME} -dir ${DIR_PATH}
      --language ${LANGUAGE} -y --overwrite
      --labels git-user:${GITLAB_USER_LOGIN},git-commit:${CI_COMMIT_SHA}
  only:
    - master
This yaml deploys the deployment package in your repository as a new revision of the given deployment version every time new commits are pushed to the master branch. If there is no version yet, a new version with VERSION_NAME will be created. Inside the script part of this yaml file you can call any function of the CLI, as long as your used token permits it, so you can expand this section if you wish. To make the script part of the yaml work, we need to configure some variables. At minimum you need to provide your deployment name, version, language and path to the deployment package in your repository. Use path ./ if your deployment file (deployment.py for Python) is in the root of your repository.- You may want to add a .ubiops-ignore file in the deployment package directory to exclude files from pushing to UbiOps. It works similarly to the well-known .gitignore file. You can configure your parameters in the variables section of the yaml, as indicated. Currently, this yaml will overwrite an existing deployment version, if you want to add a new version instead you can take out the `–overwrite` flag.
That’s all!
That’s a wrap, you now have a basic CI/CD pipeline that automatically deploys changes to UbiOps, keeping UbiOps in sync with GitLab! You can easily expand the provided yaml with more functionality by leveraging the UbiOps CLI. You can for instance add a description containing additional information like the git repository and branch, or you can add a check if the build in UbiOps was successful. If you need any help with this, don’t hesitate to reach out.Anouk Dutrée


