Powering your low-code app with AI #3 Integrate UbiOps with Appian.
If you know Python or R and wish to make an AI powered app, or simply apply more advanced analytics to existing BI apps, this is the guide for you. In this case we explain how to integrate UbiOps with an Appian app specifically.
Say you want to build an application that monitors train tracks, which has a front end where the end user can review when and how often people were detected close to the tracks. To keep things simple we won’t build the entire application. But we’ll help you build the integration with Appian, so you can build your app around it. In this case, it’ll be an API endpoint with a model behind it that you can upload pictures to, see when objects are detected, and where you can view a returned result.
For this, we need to have a pre-trained object detection model, some place to host it, and an application/front end. This article focuses on how to take the pre-trained model, host it on UbiOps, and plug it into the application you have built with Appian. Although we’re using an object detection model here, the integration is similar for other models or code.
In summary, you need:
1) A UbiOps account (create one here)
2) An Appian community account (create one here)
3) The (exported) object detection model which can be downloaded here.
1. Upload your code to UbiOps, get the API token and give it the right permissions.
You can find the pre-trained and ready-to-go object detection model here.
If you use the ‘import/export functionality’ in UbiOps to import the entire model and its settings, you won’t have to adjust anything at all to make the model work. It’s available for requests straight away. (See also: https://ubiops.com/docs/import-export/).
You can test the model in UbiOps by clicking on “create request” in the top right.

To allow our soon-to-be Appian application to make requests to the model we just deployed, we must create a service user with the right permissions to call the API endpoint of the model. In UbiOps go to permissions -> API tokens and create a new role. Ensure it has at least the ‘deployment-request-user’ role assigned. The screenshot below shows one step in the process of creating this service user, where its permissions are assigned. When you receive the API token, make sure you store it somewhere because you won’t be able to retrieve it again.
See also this page for more info: https://ubiops.com/docs/organizations/service-users/

With the model deployed you can now copy the API endpoint from the ‘general’ page of your deployment (see picture below).

In case you imported the entire model as explained in this guide, you probably did not see what the required input and output formats are. You can find this under your deployment -> versions -> ‘edit’, or copy the input format from here (JSON):
This means that the model expects something with the name “image”, and with data type “blob”, so a file.
2. Add an `integration` to your Appian project and use that integration in your app
Appian supports a system to integrate with other tools and platforms. Basically, you define how the API call to UbiOps is made. You can use this integration in your Appian application.
In this case we need two integrations
- Send the image to UbiOps
- Run your model on that image
Integration 1 – upload file to UbiOps
Assuming you have an Appian account and application setup in Appian designer you can create a new integration by clicking the new button and selecting integration.

Then select `Create from scratch (HTTP only)` , give your integration a name and create it.

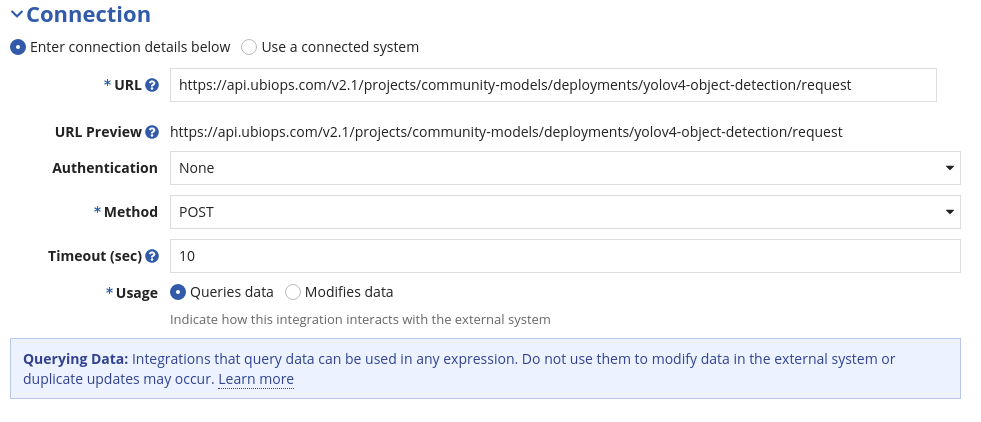
You will be redirected to the integration configuration page. Here you have to fill in a few things. The first is the connection part. Here you will have to fill in the URL of your project and add ‘/blobs’ to it. It should be in the following format “https://api.ubiops.com/v2.1/projects/{your_project_name}/blobs” Next you have to set the Method to “POST” and the usage to “Queries data”.Next is the Headers, here you have to add a header with the name “Authorization” and as value add the UbiOps token with access to the deployment.
The connection is now defined. In the Request body you will define what we are actually sending to UbiOps. The example model we are using right now has one input, named “image”. We can send that to UbiOps using the content type “Multipart From data” and give it a value of “ri!input”

The “ri!input” in this snippet takes the input of the integration and adds it to the “file” field in the request body.
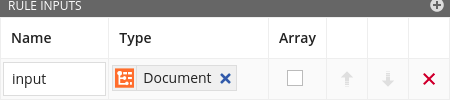
Finally, we have added the aforementioned integration input. Expand the input menu on the right hand side and simply add an input with name “input” and type document.
Save the changes of this integration. You can now use this integration anywhere in your application. You can also test the integration by clicking the “Test button request” button.
Integration 2 – make a request
Now for the second integration. You will basically make the same steps but fill in different values. Here we are going to use the blob we created earlier and make a request with it.
Again make an integration with “Create from scratch (HTTP only)” and give it a name
You will be redirected to the integration configuration page. Here you have to fill in a few things.
The first is the connection part. Here you will have to fill in the API endpoint URL of your deployment and add ‘/requests’ to it. Next you have to set the Method to “POST” and the usage to “Queries data”. Next is the Headers, here you have to add a header with the name “Authorization” and as value add the UbiOps token with access to the deployment.
The connection is now defined. In the Request body you will define what we are actually sending to UbiOps. The example model we are using right now has one input, named “image”. We can send that to UbiOps using the following JSON snippet:
{
“image”:ri!image
}
The “ri!image” in this snippet takes the input of the integration and adds it to the “number” field in the request body.
Finally we have added the aforementioned integration input. Expand the input menu on the right-hand side and simply add an input with name “image” and type text.

3. Add the integrations to your application
Now you have two Appian integrations ready to use in your Appian application. In your application you need to send the blob to UbiOps using integration 1, this will return a blob id. This blob id can then be sent to UbiOps using integration 2 which will start the model, this will return the eventual result.
For any questions don’t hesitate to reach out to us via slack or via our contact page.


