Defining and managing training workloads for machine learning models in the cloud can be a challenging task. In this post we will discuss why UbiOps is not only useful for running and scaling inference workloads, but can also be used to run training jobs for machine learning models.
You can execute scripts on UbiOps that are allowed to run non-stop for a full 2 days. Also, you can choose from both CPU as well as GPU nodes to run your training code and select different node sizes to fit your workload. This makes UbiOps a great place to offload training scripts that take too long or require too many resources for your local machine. UbiOps provides compute resources on-demand, so you only pay for the time your job is running.
In this blog post we will give you an overview on how to create a training job and run it in the cloud using UbiOps. This structure can be used for pretty much all frameworks like Tensorflow, Keras, Pytorch, Scikit Learn and others. We will create a deployment in UbiOps that contains the training code. Once we deploy this to UbiOps, we can call the API of our new training service or create a schedule to run it at a set time and interval.
We also made a Google Colab notebook so you can follow a full tutorial and try it yourself:
Defining the training job
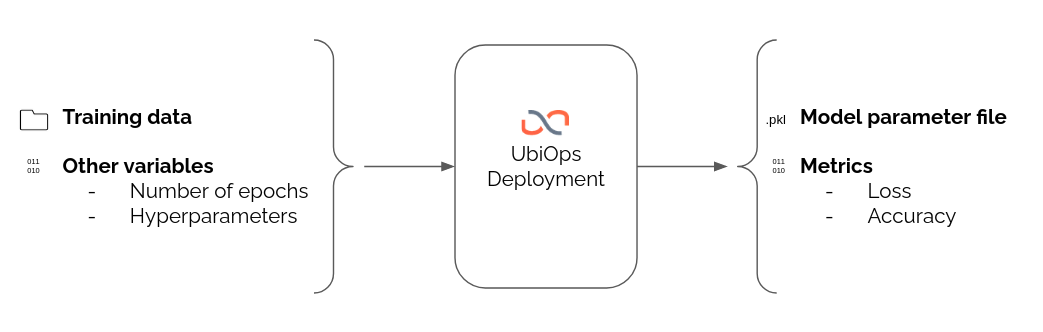
If you want to use UbiOps for training models, the layout of a training job in UbiOps can be as follows. For this example, we want the input of the deployment to be a training data set and some variable parameters for the training job, like the number of training epochs or hyperparameter settings. As output we want to return the trained model file and the final loss & accuracy metrics so we can measure performance and compare this training run to other runs.
Using the UbiOps deployment.py for training code
A microservice in UbiOps is called a Deployment. To run any Python code on UbiOps, we need to create a Python file ‘deployment.py’ and include our code here.
The UbiOps ‘deployment.py‘ structure is quite simple. It includes a Python class named ‘deployment‘ with two methods. Everything inside the ‘__init__‘ method runs when the deployment starts up. All the code inside the ‘request()‘ function runs when a call to the deployment API is made. The ‘request()‘ method will be the part where we put our training code as shown in the sample below.
# Sample code for the deployment.py file for a training job
# Alert: This code has some parts omitted for clarity. For the full code, see the notebook.

import numpy as np
import os
import tensorflow as tf
import joblib
import pathlib
import ubiops


class Deployment:

    def __init__(self, base_directory, context):

        '''Any code inside this method will run when the deployment container starts up.'''

        # Any print statement will end up in the logs of your UbiOps project
        print('Deployment initializing...')

    def request(self, data):

        '''All code inside this function will run when a call to the deployment is made.'''

        # Read the input variables. The 'data' dictionary holds all input variables passed in the call to the deployment.

        batch_size = data['batch_size']
        num_classes = data['num_classes']
        nr_epochs = data['nr_epochs']

        # Load the training data. Here we pass a URL to an object storage location. You could also pass an archive as a file.
        data_dir = tf.keras.utils.get_file(origin= data['training_data_url'])

        # Split the data in a training and validation set
        train_data = tf.keras.utils.image_dataset_from_directory(data_dir, batch_size, ...)
        val_data = tf.keras.utils.image_dataset_from_directory(data_dir, batch_size, ...)

        # Define and fit a model. In this example a Keras model.

        model = tf.keras.Sequential()

        model.compile(...)
        model.fit(
          train_data = train_data,
          validation_data = val_data,
          epochs = nr_epochs
        )

        # Evaluate the trained model
        evaluation_res = model.evaluate(val_data)

        # Return the trained model file as a binary (Pickle) and return the loss and accuracy metrics.

        joblib.dump(model, 'model.pkl')

        final_loss = evaluation_res[0]
        final_accuracy = evaluation_res[1]

        # The dictionary below will be returned through the API when the job is finished

        return {'model_file': 'model.pkl',
                'loss': final_loss,
                'accuracy': final_accuracy}
Also, we need to tell UbiOps to include a couple of Python packages, like Tensorflow, in the container. We do this by providing a ‘requirements.txt’ file in the deployment package.
We made a Google Colab notebook that holds all necessary training code for the Tensorflow example and has the commands to deploy it to a UbiOps project. If you want to see the full example and run it yourself, you can find it here: Google Colab Notebook
Loading training data and storing output
When training a model, we need to load a training data set. There are two ways to get the training data as input to the deployment when we start the run.
- The first option is to send it as a file to the deployment through the UbiOps API. This works well for small and medium sized data sets (up to ~512MB).
- The second option is to load the data from an external (object) storage solution like Amazon S3, Google Cloud Storage or Snowflake directly into your deployment by including the code for calling the storage API inside the ‘request()‘ function. This allows you to leverage the performance of existing storage systems. We use this method in this example.
Tip: you can use the authentication secrets securely in your deployment code by using environment variables
The same holds for storing output data. You can either retrieve this through the UbiOps API or store it directly from your deployment code in an external storage system using a client.
Creating the deployment and uploading the code
Now we have both the ‘deployment.py‘ file and the ‘requirements.txt‘ file, we can define a deployment in UbiOps, create a first version and push our code to the UbiOps API after which the platform will build the microservice.
We can either do this using the UbiOps WebApp (UI) or with the help of the UbiOps Python client. For a code example on how to do this with the UbiOps Python Client, go to the Google Colab notebook.
When creating a deployment, you can choose an instance type and size. For this training deployment version we chose a UbiOps Python 3.8 instance that has 4GB (4096MB) of memory. This should be sufficient to run the code, but you can choose a larger instance if you want it to run faster. For real performance improvement and acceleration, you should use GPU instances which are available in paid UbiOps plans.

Starting the training run and monitoring progress
After pushing our code UbiOps will create a Docker container including all necessary packages and make it available as a microservice with its own API. This step can take a few minutes as some packages like TensorFlow or Pytorch might take some time to install. You can follow the building process in the logs in the UbiOps WebApp.
After the building process is finished the deployment is ready to do a training run. We are going to make a request to it using the URL with the location of the training data set from the Tensorflow example and telling it to run for 5 epochs using the code below.
# The API call (request) payload
data = {
    'nr_epochs':5,
    'training_data_url':"https://storage.googleapis.com/download.tensorflow.org/example_images/flower_photos.tgz"
}
# A batch request to the default version
request_response = api.batch_deployment_requests_create(
    project_name=PROJECT_NAME,
    deployment_name=DEPLOYMENT_NAME,
    data=[data]
)
print(request_response)
Important here to notice is that we’re using a ‘batch’-type request, which is the way of running an asynchronous call to a UbiOps deployment and retrieve the result later in a different API call. The default option is ‘direct’ which is meant for low-latency calls where you receive the output in the same call.
You can also easily start a run from the browser UI by clicking the ‘create request’ button and choosing the ‘create batch request’ option.

Monitoring the training convergence
When training a model it is important to keep track of the training progress and convergence. We do this by looking at the training loss and accuracy metrics. Packages like Tensorflow will print these for you continuously, and we’re able to track them in the logging page of the UbiOps UI.

If you notice a training job is not converging, you’re able to cancel the request and try it again with different data or different parameters.
For jobs that take a long time to run, you can set email alerts to notify you when a request is finished.
Retrieving the output
When the training is completed, the deployment will provide you with the trained parameter file, the final accuracy and loss. You can retrieve this for each request using the code below and download the results to your local machine.
UbiOps will store the result, so you’re able to access it with the same call in the future.

Scaling up – Multiple training runs in parallel
If you want to start multiple training runs at the same time, that’s easy to do. Set the scaling parameter ‘max_instances’ to any number higher than 1, depending on how many jobs you want to run in parallel and make multiple requests to the deployment. Now they will be executed in parallel or queued until the next instance is available. You can see the status of each request in the ‘Requests’ tab in the Monitoring section.
What will you build next?
This is of course only an example of what you can do with UbiOps. You can extend the code in any way you like, configure it to use different input/output variables or use code that’s fully yours.
In a deployment package, you can include your own Python code files and libraries, artifacts and much more to build web services that do any task you want. From running advanced machine learning models for computer vision to automating that boring task using a bit of code.
If you want to learn more, visit our documentation pages and the How-to & Tutorials section for more inspiration


