How to turn your Python model into a Webapp using Streamlit and UbiOps
/
Building a machine learning model is great, but turning it into a live web application is a whole other story. Things like security, scalability, monitoring API management, and shareability all have to be taken into account. Today I want to show you how you can easily turn your python model into a live web app, with just Python knowledge, Ubiops, and Streamlit. The great advantage about combining these two things is that you don’t have to have any in-depth IT knowledge nor do you need any experience in front-end development.
About UbiOps
UbiOps is a SaaS service that turns your Python or R code into a scalable live application within minutes. UbiOps works with deployments and pipelines. In short, UbiOps builds a container around your code, running it as a microservice inside UbiOps that is able to receive requests to transform input data into output data. UbiOps also creates an API endpoint for the deployment. It is also possible to chain different deployments together to create a pipeline, but let’s talk about those another time.
Streamlit is an app framework that was built for ML engineers. The great thing about Streamlit is that if you know how to write Python scripts you can make Streamlit apps. The Streamlit apps that you create are basically just scripts that run from top to bottom. It does all this without the use of callbacks, which gives the advantage of having a code that always looks clean and clear. To ensure safety and to make sure that your data is easily reusable, Streamlit uses cache primitive to store your data.
1. Use case
I recently created a model that takes a handwritten digit and predicts what number it is. Now I want to take my model to the next step and turn it into a live web application. In this example, we pretend as if we need to recognize handwritten digits to identify someone’s bank account number and digitize it.
2. Script walkthrough and instructions
Below I will show the most important steps to connect your Streamlit file to your UbiOps environment. The steps shown are as follows: (1) How to connect with your UbiOps environment, (2) How to connect your UbiOps environment to Streamlit, (3) How to run your Streamlit application. In order to turn your model into a live web application, several steps are required. The first one is to connect to your UbiOps environment by creating an API token in the UbiOps web application and filling this token and your project name. Step 1) shows how that looks in code. Step 2) is to connect Streamlit to your UbiOps environment. This is done by copying the same API token and project name from step 1) into your Streamlit file. The final step (3) is to run your Sstreamlit file and see your web application come to life.
1. Connect to your UbiOps environment
API_TOKEN = '<INSERT API_TOKEN WITH PROJECT EDITOR RIGHTS>' # Make sure this is in the format "Token token-code"

PROJECT_NAME = '<INSERT PROJECT NAME IN YOUR ACCOUNT>'

DEPLOYMENT_NAME = 'mnist-streamlit'

DEPLOYMENT_VERSION = 'v1'

#import all necessary libraries:

import os

import ubiops

client = ubiops.ApiClient(ubiops.Configuration(

    api_key={'Authorization': API_TOKEN},

    host="https://api.ubiops.com/v2.1"

))

api = ubiops.CoreApi(client)
2. Connect Streamlit to your UbiOps environment
st.title("Streamlit and UbiOps example")

# Connect with your UbiOps environment

API_TOKEN = '<INSERT API_TOKEN WITH PROJECT EDITOR RIGHTS>' # Make sure this is in the format "Token token-code"

PROJECT_NAME = '<INSERT PROJECT NAME IN YOUR ACCOUNT>'

DEPLOYMENT_NAME = 'mnist-streamlit'

# API setup

if PROJECT_NAME and API_TOKEN and DEPLOYMENT_NAME:

    # Only reconnect if API object is not in session state

    if 'ubiops_api' not in st.session_state:

        with st.spinner("Connecting to UbiOps API"):

            configuration = ubiops.Configuration(host="https://api.ubiops.com/v2.1")

            configuration.api_key['Authorization'] = API_TOKEN

            client = ubiops.ApiClient(configuration)

            st.session_state.ubiops_api = ubiops.CoreApi(client)

            deployment_info = st.session_state.ubiops_api.deployments_get(PROJECT_NAME,DEPLOYMENT_NAME)

            print(deployment_info)

            sleep(2) # sleep for 2s to showcase progress spinners

            # Use the streamlit session to store API object

            if(st.session_state.ubiops_api.service_status().status == 'ok' ):

                st.success("Connected to UbiOps API!")

            else:

                st.error("Not connected!")
3. Run your Streamlit file
!streamlit run mnist-streamlit.py
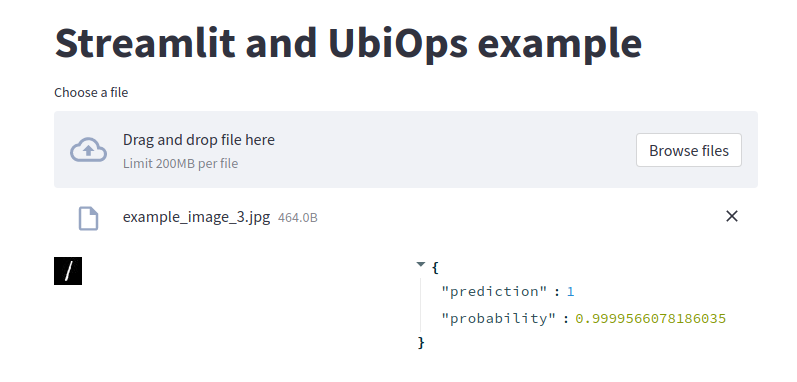
After running your mnist-streamlit.py file and making your first request, it should look like this:
3. Wrap up
And that is all it takes to turn your model into a live web application! We hope that this helps you in your day-to-day projects. For any questions or suggestions please join the UbiOps community slack channel or contact our customer support.