In the previous How to deploy YOLOv4 on UbiOps, we showed how easy it is to deploy and serve a pre-trained image recognition model with UbiOps. UbiOps is a robust and scalable production environment for data science and machine learning workloads. If you want to read more about what is important in an AI production environment, you could read our earlier blog post on the Ten commandments of MLops.
Next to deploying and serving your code, you also need to connect your deployed model to, for example, a web application to really put it to use and show its value. That’s why in this article we are going to show you how to build an image classification web app with the YOLOv4 model running in UbiOps.
UbiOps will run the trained YOLOv4 network as a microservice which is accessible through the UbiOps API. We will use this API endpoint for further implementation.
In this tutorial, you will
- Learn about API tokens
- Create an API token
- Learn about requests
- Learn about the auto-scaling settings for your model
Requirements
- Free account on UbiOps
- YOLOv4 deployed on UbiOps
What is an API token ?
In general API tokens are used to securely authenticate one piece of software to another. In UbiOps, API tokens are very important. They enable granting another application, in this case a web app, secure access to the API endpoint of a model running on UbiOps.
These tokens can be configured to have different access permissions. For example, allowing only to use a model in UbiOps but restricting modifications.
In this tutorial, we are going to use an API token to let our web app use the YOLOv4 model.
Getting an API token in UbiOps
To create an API token in UbiOps go to Users & Permissions on the left-side menu. Then select API tokens and click on the Add button. Fill in a name for your token and click Next step. Copy the token and click Next step. Now you can assign roles to your token. Choose Model-admin and click assign.
For more info you should check our token documentation.

Integration with the web application
Now we have the model up and running and a way to send it data, we need to connect it to a user interface so our users can easily upload their images.
For this, we develop a simple React-based web app that makes the call to the model API endpoint in the background when a user clicks the ‘upload image’ button. This is a synchronous request, so the web app receives the result of the model in the same call that makes the request, simplifying the implementation and resulting in lower response latency.

The created API token is used for authentication between the web app and the UbiOps API.
We won’t dive into detail on the structure of the React app itself. The interactive element is the ‘Upload Image’ button which triggers a POST request to the model endpoint.
Because we are working with an image as a payload, we need to make an additional request to the UbiOps API to create a ‘blob’ object within UbiOps where the image is temporarily stored. The ID of this ‘blob’ is passed in the request as payload so UbiOps knows where to look for the image file.

You can take a look at https://docs.ubiops.com/docs/blobs for more details about blobs and file management.
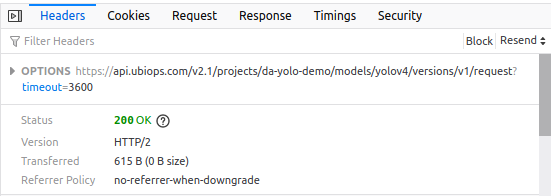
Here we see the request URL we use to send the request to. In response, we get a status 200 code, which means the request was successful.
In the logs of UbiOps, we can now actually see that a request to the model is made and processed.
The output of the model, the annotated image, is again saved as a blob within UbiOps and collected by the web app using the blob ID that was returned by the model request.


Scaling up
The good thing about running your machine learning code on UbiOps is that it also scales automatically based on the amount of requests. What exactly is auto-scaling? When your app attracts more users, you don’t have to worry about manually adding more compute resources. UbiOps does this for you. The platform automatically increases the amount of running instances with your model. They can process the incoming requests in parallel.
You can control the way UbiOps scales your model by adjusting the scaling parameters:
- Minimum instances: When your model is not used for a specified amount of time, the platform scales back the number of running instances (workers) for your model to this amount. It also allows you to scale to zero, which saves resources!
- Maximum instances: You can also cap the maximum amount of parallel instances of a model. This can come in handy when you want to save resources and latency is not a concern.
- Maximum idle time: The amount of time after which the platform scales your model back to the ‘minimum instances’ amount, without any new requests.
All these settings give you more control on the availability of your application. The great thing about this auto-scaling ability is not only the increased performance you can offer users, or the saved manual labour of maintaining the server side of your app. But also that you can save costs on cloud resources. You only use what you actually need, and can scale back otherwise.
Here you can see the scaling settings used for our demo web app:

You can adjust these settings by clicking the ‘Edit’ button and expand the ‘Advanced Parameters’ drop-down menu.
Wrapping up
In this blog post series, we show how to deploy and run the YOLO2 image classification model using the UbiOps platform. How to integrate it with a web application.
If you want to try UbiOps for yourself, try the free version at https://app.ubiops.com/sign-up/
For more information about the UbiOps platform, see our website and documentation
Have fun building your data-driven application!


