Accelerate workflows with NVIDIA RAPIDS on UbiOps!
Download notebook View source code
NVIDIA RAPIDS is a suite of open-source software libraries and APIs developed by Nvidia that gives scientists and data analysts the ability to execute end-to-end data science and analytics pipelines completely on GPUs! This makes many different data analytics and machine learning workflows a lot faster. This tutorial will showcase how you can create a Linear Regression classifier on a synthetic dataset with different NVIDIA RAPIDS libraries, implemented on UbiOps!
The following steps are performed in this tutorial:
- Connect to the UbiOps API
- Create baseline model
- Accelerate model with NVIDIA RAPIDS
- Implement models into deployment
- Create UbiOps environment
- Create and upload deployment to UbiOps
- Run deployment
- Compare results
Note that GPU access is needed in UbiOps to run this tutorial. UbiOps has support for GPU deployments, but this feature is not enabled for customers by default. Please contact us for more information and to enable GPU access! It is recommended to connect to a GPU runtime (if available) for local testing purposes. If local testing is unwanted, a simple runtime will suffice as well for following this tutorial.
The following results were achieved by using NVIDIA RAPIDS:
Connect to the UbiOps API
Let's set up our workspace!
First things first, we are going to initialize our UbiOps Python Client
!pip install "ubiops >= 3.15, <4"
import ubiops


API_TOKEN = "Token ..." # TODO: Add your UbiOps token here
PROJECT_NAME = "" # TODO: Add your project name here

ENVIRONMENT_NAME = "nvidia-rapids-env"

DEPLOYMENT_NAME = "nvidia-rapids-benchmark"
VERSION_NAME = "v1"

DEPLOYMENT_DIR = "deployment_package"
ENVIRONMENT_DIRECTORY_NAME = "environment_package"
configuration = ubiops.Configuration(host="https://api.ubiops.com/v2.1")
configuration.api_key['Authorization'] = API_TOKEN

api_client = ubiops.ApiClient(configuration)
core_instance = ubiops.CoreApi(api_client=api_client)
training_instance = ubiops.Training(api_client=api_client)
print(core_instance.service_status())
Now it's time to create directories to store our deployment/environment code!
!mkdir {DEPLOYMENT_DIR}
!mkdir {ENVIRONMENT_DIRECTORY_NAME}
Now our workspace is all set up, let's start creating our baseline model
Create baseline model
In order to showcase the performance improvements by utilizing NVIDIA RAPIDS, we want to have a baseline model to test against first. For this, we will create a simple Random Forest classifier.We are going to use Scikit-Learn and Pandas for this.
We are creating the following functions for the baseline model: - generate_dataset: Generate a random dataset for a certain amount of samples and features - convert_to_pandas: Convert our dataset to a Pandas Dataframe (useful for when we start creating an NVIDIA RAPIDS accelerated model) - train_lr: Train a Linear Regression model (with Scikit-Learn) - make_predictions: Make model predeictions - calculate_mse: Calculate the Mean Square Error (MSE)
%%writefile {DEPLOYMENT_DIR}/baseline_model.py

import time

import pandas as pd
from sklearn.datasets import make_classification
from sklearn.linear_model import LinearRegression
from sklearn.metrics import mean_squared_error
from sklearn.model_selection import train_test_split


class BaselineModel:
    def __init__(self):
        self.sklearn_lr = LinearRegression()

    @staticmethod
    def generate_dataset(n_samples, n_features=20):
        x, y = make_classification(n_samples=n_samples, n_features=n_features)
        x_train, x_test, y_train, y_test = train_test_split(x, y, test_size=0.2)
        return x_train, x_test, y_train, y_test

    @staticmethod
    def convert_to_pandas(x_train, y_train, x_test):
        pandas_x_train = pd.DataFrame(x_train)
        pandas_y_train = pd.Series(y_train)
        pandas_x_test = pd.DataFrame(x_test)
        return pandas_x_train, pandas_y_train, pandas_x_test

    def train_lr(self, pandas_x_train, pandas_y_train):
        start_time = time.time()
        self.sklearn_lr.fit(pandas_x_train, pandas_y_train)
        return time.time() - start_time

    def make_predictions(self, pandas_x_test):
        start_time = time.time()
        sklearn_predictions = self.sklearn_lr.predict(pandas_x_test)
        return sklearn_predictions, time.time() - start_time

    @staticmethod
    def calculate_mse(y_test, sklearn_predictions):
        return mean_squared_error(y_test, sklearn_predictions)
Accelerate model with NVIDIA RAPIDS
Now that we have our baseline model, we can accelerate this model by using the corresponding NVIDIA RAPIDS equivalent libraries/functions. The table below showcases the NVIDIA RAPIDS library equivalent to the "standard" library.
| Standard Libraries | NVIDIA RAPIDS Equivalent |
|---|---|
| Pandas | cuDF |
| Scikit-learn | cuML |
%%writefile {DEPLOYMENT_DIR}/rapids_model.py

import time
import cudf
from cuml.linear_model import LinearRegression
from cuml.metrics import mean_squared_error


class RapidsModel:
    def __init__(self):
        self.cu_lr = LinearRegression()

    @staticmethod
    def convert_to_cudf(pandas_x_train, pandas_y_train, pandas_x_test):
        cudf_x_train = cudf.DataFrame.from_pandas(pandas_x_train)
        cudf_y_train = cudf.Series(pandas_y_train)
        cudf_x_test = cudf.DataFrame.from_pandas(pandas_x_test)
        return cudf_x_train, cudf_y_train, cudf_x_test

    def make_predictions(self, cudf_x_test):
        start_time = time.time()
        cu_predictions = self.cu_lr.predict(cudf_x_test)
        return cu_predictions, time.time() - start_time

    def train_lr(self, cudf_x_train, cudf_y_train):
        start_time = time.time()
        self.cu_lr.fit(cudf_x_train, cudf_y_train)
        return time.time() - start_time

    @staticmethod
    def calculate_mse(y_test, cu_predictions):
        return mean_squared_error(y_test, cu_predictions)
As you can see in the code block above, the core is exactly the same as in the baseline model! Some parameters are changed to give a better description, but all the function calls are entirely the same. The only difference is the library from which it is imported. In the baseline model, this is sklearn, in the accelerated model, it's cudf and cuml.
Implement models into deployment
Now that we've written our code for a baseline model and a NVIDIA RAPIDS accelerated model, we can integrate both into a UbiOps deployment. UbiOps deployment require fixed in- and outputs, as is outlined in the documentation.
We will use the following input/output structure:
| Input/Output | Name | Type | Description |
|---|---|---|---|
| Input | n_samples | Integer | Number of samples in the dataset |
| Input | n_features | Integer | Number of features per sample |
| Output | scikit-mse | Double Precision | Mean Squared Error using scikit-learn |
| Output | cuml-mse | Double Precision | Mean Squared Error using cuML |
| Output | scikit-train-time | Double Precision | Training time using scikit-learn |
| Output | cuml-train-time | Double Precision | Training time using cuML |
| Output | scikit-pred-time | Double Precision | Prediction time using scikit-learn |
| Output | cuml-pred-time | Double Precision | Prediction time using cuML |
Let's integrate the models into the UbiOps deployment structure, with the inputs/outputs as specified in the table above!
%%writefile {DEPLOYMENT_DIR}/deployment.py

import time

from baseline_model import BaselineModel
from rapids_model import RapidsModel


class Deployment:
    def __init__(self):
        self.baseline_model = None
        self.rapids_model = None

    def request(self, data):
        n_samples = data.get("n_samples", 1000000)
        n_features = data.get("n_features", 20)

        self.baseline_model = BaselineModel()
        self.rapids_model = RapidsModel()

        start_time = time.time()
        x_train, x_test, y_train, y_test = self.baseline_model.generate_dataset(n_samples, n_features)
        print("Dataset generation time: ", time.time() - start_time)

        start_time = time.time()
        pandas_x_train, pandas_y_train, pandas_x_test = self.baseline_model.convert_to_pandas(x_train, y_train, x_test)
        print("Pandas conversion time: ", time.time() - start_time)

        # Delete the dataframes to free up memory
        del x_train, x_test, y_train

        start_time = time.time()
        cudf_x_train, cudf_y_train, cudf_x_test = self.rapids_model.convert_to_cudf(
            pandas_x_train,
            pandas_y_train,
            pandas_x_test
        )
        print("CuDF conversion time: ", time.time() - start_time)

        sklearn_train_time = self.baseline_model.train_lr(
            pandas_x_train,
            pandas_y_train,
        )
        cu_train_time = self.rapids_model.train_lr(cudf_x_train, cudf_y_train)

        sklearn_predictions, sklearn_prediction_time = self.baseline_model.make_predictions(pandas_x_test)
        cu_predictions, cu_prediction_time = self.rapids_model.make_predictions(cudf_x_test)

        sklearn_mse = self.baseline_model.calculate_mse(y_test, sklearn_predictions)
        cu_mse = self.rapids_model.calculate_mse(y_test, cu_predictions)

        return {
            "scikit-mse": sklearn_mse,
            "cuml-mse": cu_mse.tolist(),
            "scikit-train-time": sklearn_train_time,
            "cuml-train-time": cu_train_time,
            "scikit-pred-time": sklearn_prediction_time,
            "cuml-pred-time": cu_prediction_time
        }
Now, our code is all set up! We can now continue to create our UbiOps environment and upload our model.
We can also test our code locally. We will do that in the next (sub)section, but is not necessary.
Do note that a NVIDIA GPU is needed and CUDA needs to be installed on the machine to test this deployment locally!
Test deployment locally
Before deploying our model, we can test its functionality locally as well. This will be done by running the deployment in the current Python environment. For this to succeed, the proper hardware and software is needed. To run the deployment locally, the following is needed: - NVIDIA GPU - CUDA Installed
We can test both by running the following commands:
!nvcc --version
!nvidia-smi
If we have the proper pre-requisites, the installed CUDA version and GPU information will be shown.
We furthermore need to install the proper pip packages by running the following command:
!pip install --extra-index-url https://pypi.nvidia.com \
  wheel \
  setuptools \
  cudf-cu11 \
  cuml-cu11 \
  scikit-learn \
  pandas -q
Now that we have installed the proper packages, we can test the deployment locally!
data_input = {
    "n_samples": 10 ** 6,
    "n_features": 50
}

ubiops.utils.run_local(DEPLOYMENT_DIR, data_input)
As we can see, our deployment works as expected. We can now upload our deployment to UbiOps!
Create UbiOps environment
Before uploading our deployment to UbiOps, we need to create an environment for the deployment to run in. This environment contains additional OS-level dependencies and pip packages. To specify the additional contents of an environment, the following 2 files need to be defined: - requirements.txt: This file specifies which pip packages need to be installed - ubiops.yaml: This file specifies the additional OS-level dependencies
More information on UbiOps environments can be found in the documentation
Let's define our environment now!
We first start of by creating the requirements.txt file with the pip packages we need.
%%writefile {ENVIRONMENT_DIRECTORY_NAME}/requirements.txt

--extra-index-url https://pypi.nvidia.com
wheel
setuptools
cudf-cu11
cuml-cu11
scikit-learn
pandas
Now that we've specified the requirements.txt file, it's time to move on to the ubiops.yaml file.
In the environment, we need to have CUDA with some additional CUDA packages. UbiOps doesn't provide a base environment with the proper additional CUDA packages installed for this implementation. Therefore, we will install all the CUDA packages manually with the ubiops.yaml file!
The former can be achieved with the following ubiops.yaml file:
%%writefile {ENVIRONMENT_DIRECTORY_NAME}/ubiops.yaml

environment_variables:
  - PATH=/usr/local/nvidia/bin:/usr/local/cuda/bin:${PATH}
  - LD_LIBRARY_PATH=/usr/local/nvidia/lib:/usr/local/nvidia/lib64:/usr/local/cuda/lib64:${LD_LIBRARY_PATH}
apt:
  keys:
    urls:
      - https://developer.download.nvidia.com/compute/cuda/repos/ubuntu2204/x86_64/3bf863cc.pub
  sources:
    items:
      - deb https://developer.download.nvidia.com/compute/cuda/repos/ubuntu2204/x86_64 /
  packages:
    - cuda-toolkit-11-7
We've just created all the files we need to make our own UbiOps environment.
We can now create an environment and then upload our files to it, do note that the environment might take a while to build.
# Create environment in UbiOps
try:
    core_instance.environments_create(
        project_name=PROJECT_NAME,
        data=ubiops.EnvironmentCreate(
            name=ENVIRONMENT_NAME,
            display_name=ENVIRONMENT_NAME,
            base_environment="ubuntu22-04-python3-11",
            description="CUDA Toolkit 11.7 environment",
        )
    )
except ubiops.exceptions.ApiException as e:
    print(e)
import shutil

# Upload files to environment
try:
    # Zip the directory with the training environment dependencies
    environment_archive = shutil.make_archive(ENVIRONMENT_DIRECTORY_NAME, 'zip', ENVIRONMENT_DIRECTORY_NAME)

    core_instance.environment_revisions_file_upload(
        project_name=PROJECT_NAME,
        environment_name=ENVIRONMENT_NAME,
        file=environment_archive
    )
except ubiops.exceptions.ApiException as e:
    print(e)

# Wait for environment to be ready
ubiops.utils.wait_for_environment(core_instance.api_client, PROJECT_NAME, ENVIRONMENT_NAME, 1800)
We have now created our environment on the UbiOps infrastructure.
Let's proceed to creating a deployment and uploading our deployment code.
Create and upload deployment to UbiOps
Finally, we've reached the last step of the setup process: creating a deployment on Ubiops and uploading our deployment code to UbiOps.
Let's begin by creating a new deployment!
input_fields = [
    {'name': 'n_samples', 'data_type': 'int'},
    {'name': 'n_features', 'data_type': 'int'}
]

output_fields = [
    {'name': 'scikit-mse', 'data_type': 'double'},
    {'name': 'cuml-mse', 'data_type': 'double'},
    {'name': 'scikit-train-time', 'data_type': 'double'},
    {'name': 'cuml-train-time', 'data_type': 'double'},
    {'name': 'scikit-pred-time', 'data_type': 'double'},
    {'name': 'cuml-pred-time', 'data_type': 'double'}
]


deployment_template = ubiops.DeploymentCreate(
    name=DEPLOYMENT_NAME,
    description='Deployment to demonstrate NVIDIA RAPIDS model acceleration',
    input_type='structured',
    output_type='structured',
    input_fields=input_fields,
    output_fields=output_fields
)

deployment = core_instance.deployments_create(project_name=PROJECT_NAME, data=deployment_template)
Now we add a deployment version to the newly created deployment:
version_template = ubiops.DeploymentVersionCreate(
    version=VERSION_NAME,
    environment=ENVIRONMENT_NAME,
    instance_type_group_name='16384 MB + 4 vCPU + NVIDIA Tesla T4',
    maximum_instances=1,
    minimum_instances=0,
    maximum_idle_time=600, # = 10 minutes
    request_retention_mode='full'
)

core_instance.deployment_versions_create(
    project_name=PROJECT_NAME,
    deployment_name=DEPLOYMENT_NAME,
    data=version_template
)
At last, we upload our deployment code to the newly created deployment version:
deployment_archive = shutil.make_archive(DEPLOYMENT_DIR, 'zip', DEPLOYMENT_DIR)

core_instance.revisions_file_upload(
    project_name=PROJECT_NAME,
    deployment_name=DEPLOYMENT_NAME,
    version=VERSION_NAME,
    file=deployment_archive
)
Let's wait for our deployment to be done!
ubiops.utils.wait_for_deployment_version(core_instance.api_client, PROJECT_NAME, DEPLOYMENT_NAME, VERSION_NAME)
Run deployment
Now it's time to use our deployment.
Let's define a function to create a request and a function to plot results:
!pip install matplotlib
import matplotlib.pyplot as plt

# function to create deployment requests
def create_request(core_instance, features, samples):
    data = {
        "n_features": features,
        "n_samples": 10**samples
    }
    request = core_instance.deployment_version_requests_create(
        project_name=PROJECT_NAME,
        deployment_name=DEPLOYMENT_NAME,
        version=VERSION_NAME,
        data=data
    )
    result_save = {
        "n_samples": data["n_samples"],
        "n_features": data["n_features"],
        **request.result
    }
    print(request.result)
    return result_save

def plot_graph(results, time_key, title, feature_list):
    plt.figure(figsize=(10, 10))
    plt.title(title)
    plt.xlabel("Number of samples")
    plt.ylabel("Time (s)")
    plt.xscale("log")

    for i, features in enumerate(feature_list):
        filtered_results = [result for result in results if result["n_features"] == features]
        n_samples = [result["n_samples"] for result in filtered_results]
        scikit_times = [result[f'scikit-{time_key}'] for result in filtered_results]
        cuml_times = [result[f'cuml-{time_key}'] for result in filtered_results]
        color = 'blue' if features == 5 else 'red'

        plt.plot(n_samples, scikit_times, label=f"Scikit-learn {features} features", linestyle="dashed", color=color)
        plt.plot(n_samples, cuml_times, label=f"CuML {features} features", linestyle="solid", color=color)
    plt.legend()
Let's call our function now and save the results:
features = [5, 50]
range_samples = range(4,8)

results = [create_request(core_instance, feature, n_samples) for n_samples in range_samples for feature in features]
We can proceed to plot the results now:
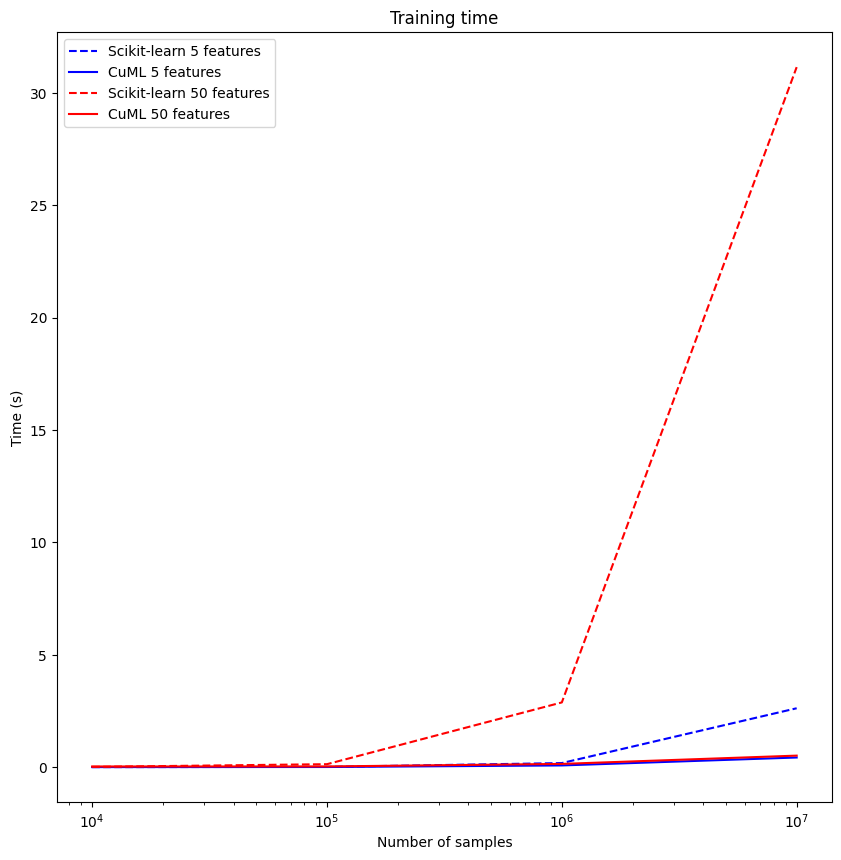
plot_graph(results, "train-time", "Training time", features)
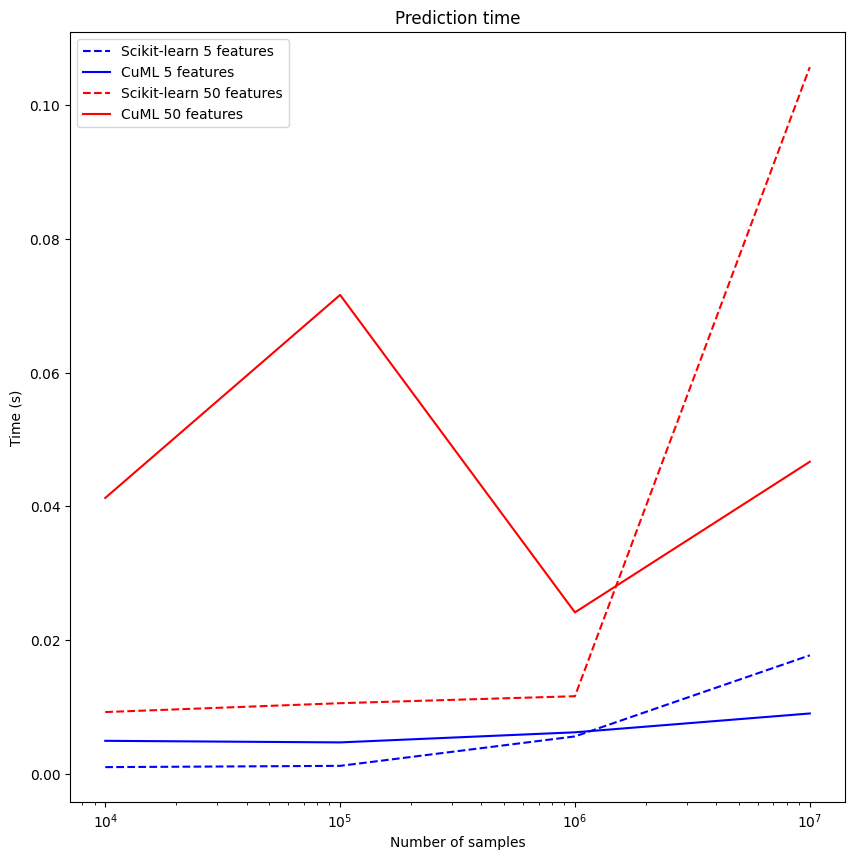
plot_graph(results, "pred-time", "Prediction time", features)
plt.show()
As we can see in our newly made plots, using NVIDIA RAPIDS libraries greatly speeds up our training time on bigger datasets. The prediction time doesn't benefit greatly from GPU parallelization in this use case (as parallelization potential doesn't outweigh the extra GPU overhead), but this could very well be much different for other applications.
Conclusion
In this tutorial, we've made a Linear Regression model, improved the training time of this model greatly with NVIDIA RAPIDS and deployed a benchmark on UbiOps!
Don't hesitate to contact us for any further information or to see what we can do for you!
# Close the UbiOps Python client
api_client.close()