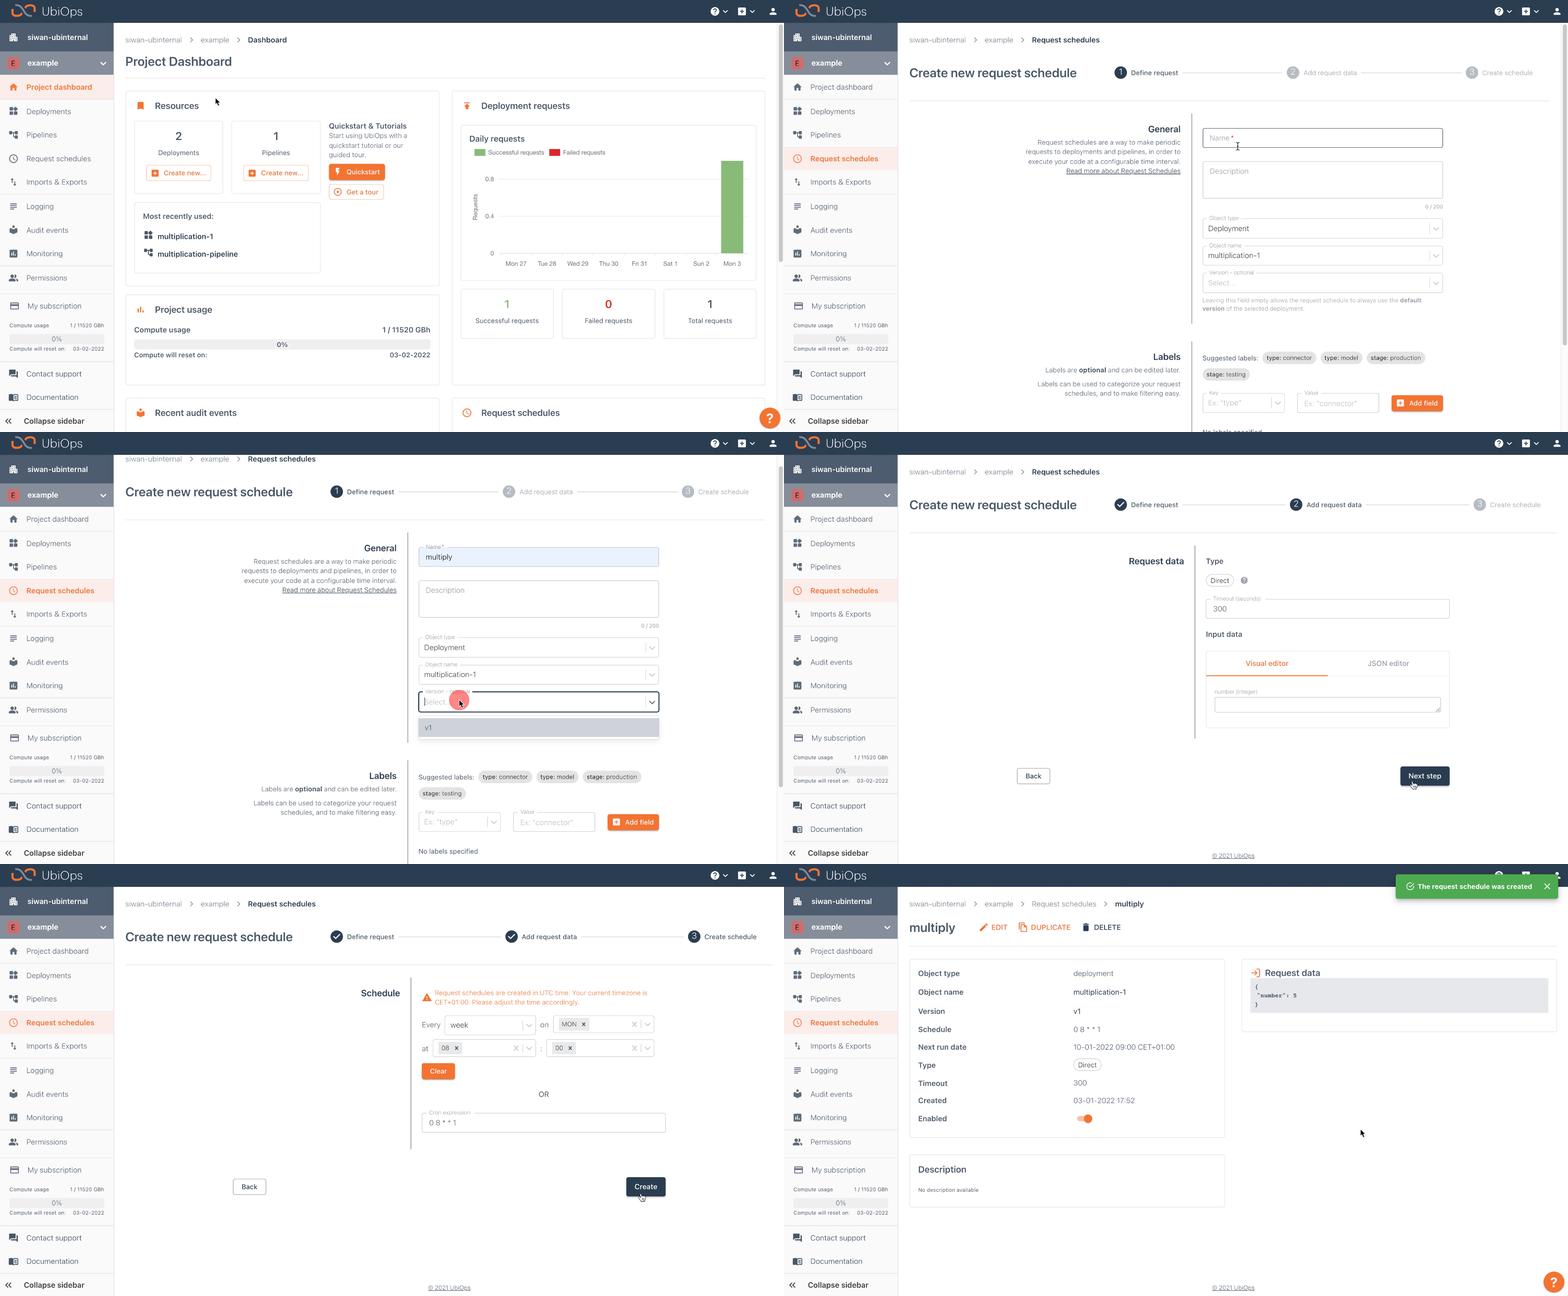
Scheduling requests
Request Schedules are a way to make periodic requests to deployments and pipelines, in order to execute your code at a configurable time interval. This can, for example, be useful if your deployment or pipeline does not depend on direct input data, but instead connects to a data source inside the code.
A Request Schedule can be compared to a traditional Unix cron job that periodically makes requests to your deployment or pipeline, instead of making requests via the API or manually in the WebApp.
Creating Request Schedules
Request Schedules can be managed in the dedicated area for schedules that can be found in the main menu of the UbiOps WebApp.

A schedule applies to a single deployment or a pipeline. Each schedule consists of 4 elements:
- A name, used to identify the schedule in the WebApp and API calls.
- The object it makes requests to, either a deployment version or a pipeline.
- The request data sent with each request, which is a static value. It may be empty.
- The schedule in the traditional Unix cron job format. This schedule is processed in UTC time.
The WebApp contains a user friendly interface to configure the interval of your Request Schedule without having to write the schedule in cron job format yourself.
In case you would like to configure a more advanced schedule, it is denoted in the format of a standard Unix cron job, consisting of 5 consecutive elements separated by spaces:
- The minute (0 - 59)
- The hour (0 - 23)
- The day of the month (1 - 31)
- The month (1 - 12)
- The day of the week (0 - 6) starting with Sunday
The schedule supports all standard elements of the cron job notation, such as * as a wildcard and the slash notation */2 to indicate a step-interval.
For example:
* * * * *would execute every minute*/5 * * * *would execute every five minutes15 16 * * *would execute daily at 16:15*/2 2-4,19-21 * * *would execute every 2nd minute between 2 and 4 in the morning and 19 and 21 in the evening.
It might be handy to be able to inspect the requests made by your schedule at a later moment. To do so, you will need to turn on request retention. Once turned on, all the created requests will be visible in the requests tab of your deployment or pipeline version. When creating a request schedule you can also specify a TimeOut, after which the scheduler aborts the request in case it was not finished. The allowed TimeOut values are dependent on the type of request and if the request is made for a pipeline or a deployment. You can find an overview of the allowed TimeOuts on the requests page.
The requests triggered by the Request Schedule are usually made within 15 seconds of the time defined by the schedule. Please keep in mind that there can be additional delays caused by a cold start of your deployment, all deployment instances being busy with other requests, or by the normal execution delay of batch requests.
After creation, a Request Schedule can be disabled and enabled if you want to pause the schedule for a while without deleting it.
Information about managing request schedules via the API can be found on our Swagger API explorer.
Manually triggering Request Schedules
It is possible to manually trigger a Request Schedule by clicking on the Run now button on a Request Schedule details page in the WebApp. While doing so, a similar request is made to the deployment/pipeline as when the Request Schedule would be triggered via its time schedule, even if the time schedule is disabled.
Managing access to Request Schedules
There are no separate roles or permissions for request schedules. Users that have permissions to create and list requests to a deployment or pipeline are also able to create, list, edit or delete request schedules for that deployment.
Learn more about permissions in UbiOps on Permissions and roles.