Enable an SSH connection to a running deployment
When debugging, it might come in handy to be able to SSH directly into a running deployment to investigate. By opening up a port on the deployment and adjusting your code a bit, it's possible to do this. In this how-to we'll walk you through the following steps:
- Adjust the deployment package to allow SSH connections via OpenSSH
- Adjust the port forwarding settings for your deployment
- Connect via your terminal
For this example we will use the multiply example deployment from our starter tutorial.
Create a deployment that sets up the SSH requirements
To create a deployment that allows you to establish an SSH connection with it, we need to do a few things:
- Adjust the deployment environment to allow SSH connections
- Adjust the deployment.py to accept SSH connections via OpenSSH
- Adjust the deployment configuration to work with port forwarding
Let's start with adjusting the environment.
Adjust the deployment environment specifications
We will be using OpenSSH to allow SSH connections. To be able to use it, we need to add a ubiops.yaml file to our deployment package:
apt:
    packages:
        - openssh-server
We also need an sshd_config file that ensures that the host keys are properly read from the deployment. Make sure you create an sshd_config file with the following contents and save it in your deployment package folder (or your environment folder if you're using custom environments).
Port 2222

HostKey /home/deployment/.ssh/ssh_host_rsa_key
HostKey /home/deployment/.ssh/ssh_host_ecdsa_key
HostKey /home/deployment/.ssh/ssh_host_ed25519_key

PasswordAuthentication no
ChallengeResponseAuthentication no
UsePAM yes
PrintMotd no
AcceptEnv LANG LC_*
ClientAliveInterval 120
UseDNS no
Adjust the deployment.py to allow SSH connections
As mentioned before, we are using the multiply deployment from our starter tutorial as our base. The deployment code looks like this:
class Deployment:

    def __init__(self, base_directory, context):

        print("Initialising deployment")

    def request(self, data):

        print("Processing request")
        # Retrieve the user input from the data dictionary
        user_input = data['number']

        # Process the input
        number_multiplied = user_input * 2

        # Return the output
        return {'number_multiplied': number_multiplied}
To allow SSH connections to this deployment, we need to alter the __init__ function. We want to make sure that access via SSH is limited to a specific public key. In this example we will provide the public key via an environment variable to the deployment. That means we can do the following:
# Write the public key to authorized keys
os.mkdir("/home/deployment/.ssh/")
try:
    with open("/home/deployment/.ssh/authorized_keys", "w") as f:
        f.write(os.environ["SSH_PUBLIC_KEY"])
    print("SSH key has been set")
except KeyError:
    print("Failed to set SSH key")
Now that the public key of our environment variable is saved in our authorized keys file, we still need to generate our SSH host keys and start a subprocess:
# Generate SSH host keys
subprocess.run(["ssh-keygen", "-t", "rsa", "-N", "", "-f", "/home/deployment/.ssh/ssh_host_rsa_key"])
subprocess.run(["ssh-keygen", "-t", "ecdsa", "-N", "", "-f", "/home/deployment/.ssh/ssh_host_ecdsa_key"])
subprocess.run(["ssh-keygen", "-t", "ed25519", "-N", "", "-f", "/home/deployment/.ssh/ssh_host_ed25519_key"])

subprocess.Popen(["/usr/sbin/sshd", "-f", "/home/deployment/sshd_config"])
Lastly we need to check what the IP address is of the instance and print it to the logs. We need the IP address to be able to connect to the deployment from our terminal and the IP address can be different every time a deployment starts. We can retrieve the IP address by checking the 'Active Instances' tab at the deployment version level in the WebApp. Alternatively, we can find the IP address using the UbiOps IP checker (https://whatismyipv4.ubiops.com) and printing the retrieved IP address to the logs.
# Get the IP address and print to the logs
http_request = urllib.request.urlopen("https://whatismyipv4.ubiops.com")
ip_address = http_request.read().decode("utf8")
http_request.close()
print(f"The IP address of this deployment is: {ip_address}")
Establishing an SSH connection to an instance in an internal network
When your instance is only accessible within an internal network, then the 'Active Instances' tab is the only place to find the internal IP: the UbiOps IP checker finds the external IP address not the internal IP address.
Putting this all together gives us the following adjusted deployment.py:
import os
import subprocess
import urllib.request


class Deployment:

    def __init__(self):
        # Write the public key to authorized keys
        os.mkdir("/home/deployment/.ssh/")
        try:
            with open("/home/deployment/.ssh/authorized_keys", "w") as f:
                f.write(os.environ["SSH_PUBLIC_KEY"])
            print("SSH key has been set")
        except KeyError:
            print("Failed to set SSH key")

        # Generate SSH host keys
        subprocess.run(["ssh-keygen", "-t", "rsa", "-N", "", "-f", "/home/deployment/.ssh/ssh_host_rsa_key"])
        subprocess.run(["ssh-keygen", "-t", "ecdsa", "-N", "", "-f", "/home/deployment/.ssh/ssh_host_ecdsa_key"])
        subprocess.run(["ssh-keygen", "-t", "ed25519", "-N", "", "-f", "/home/deployment/.ssh/ssh_host_ed25519_key"])

        subprocess.Popen(["/usr/sbin/sshd", "-f", "/home/deployment/sshd_config"])

        # Get the IP address and print to the logs
        http_request = urllib.request.urlopen("https://whatismyipv4.ubiops.com")
        ip_address = http_request.read().decode("utf8")
        http_request.close()

        print()
        print(f"The IP address of this deployment is: {ip_address}")

    def request(self, data):
        print("Processing request")
        # Retrieve the user input from the data dictionary
        user_input = data['number']

        # Process the input
        number_multiplied = user_input * 2

        # Return the output
        return {'number_multiplied': number_multiplied}
Adjust the deployment configuration to work with port forwarding
If you followed the last two sections, you should now have a deployment package that looks like this:
deployment_package/
├── deployment.py
├── ubiops.yaml
└── sshd_config
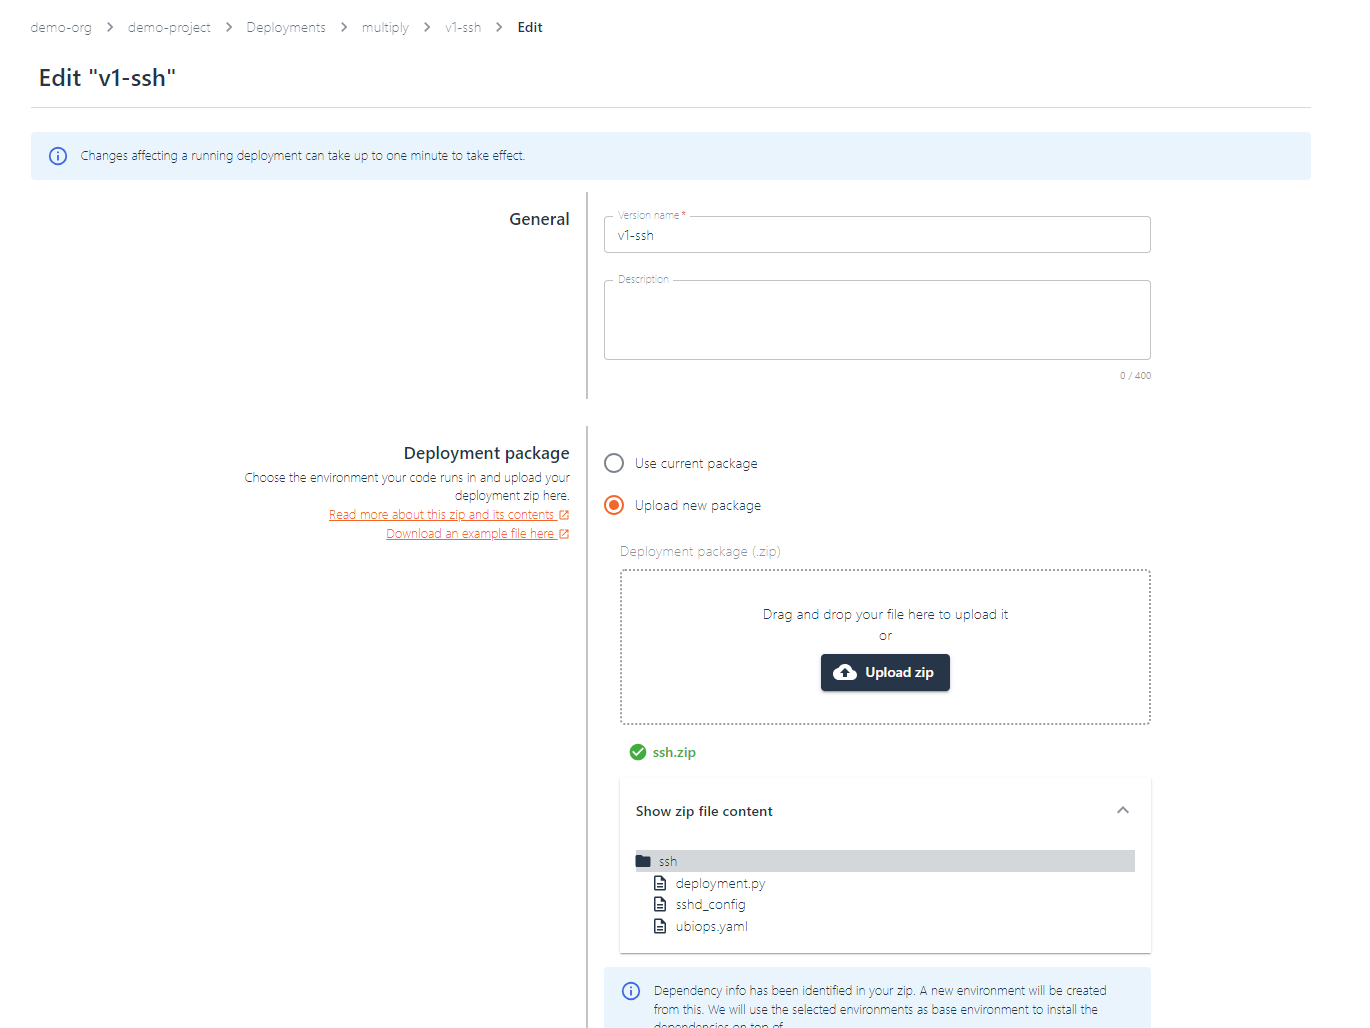
Let's adjust the deployment configuration to be able to work with the adjustments. Go to your deployment version in the WebApp and click EDIT. Zip the deployment package folder containing all the changes and upload it in the deployment package section.
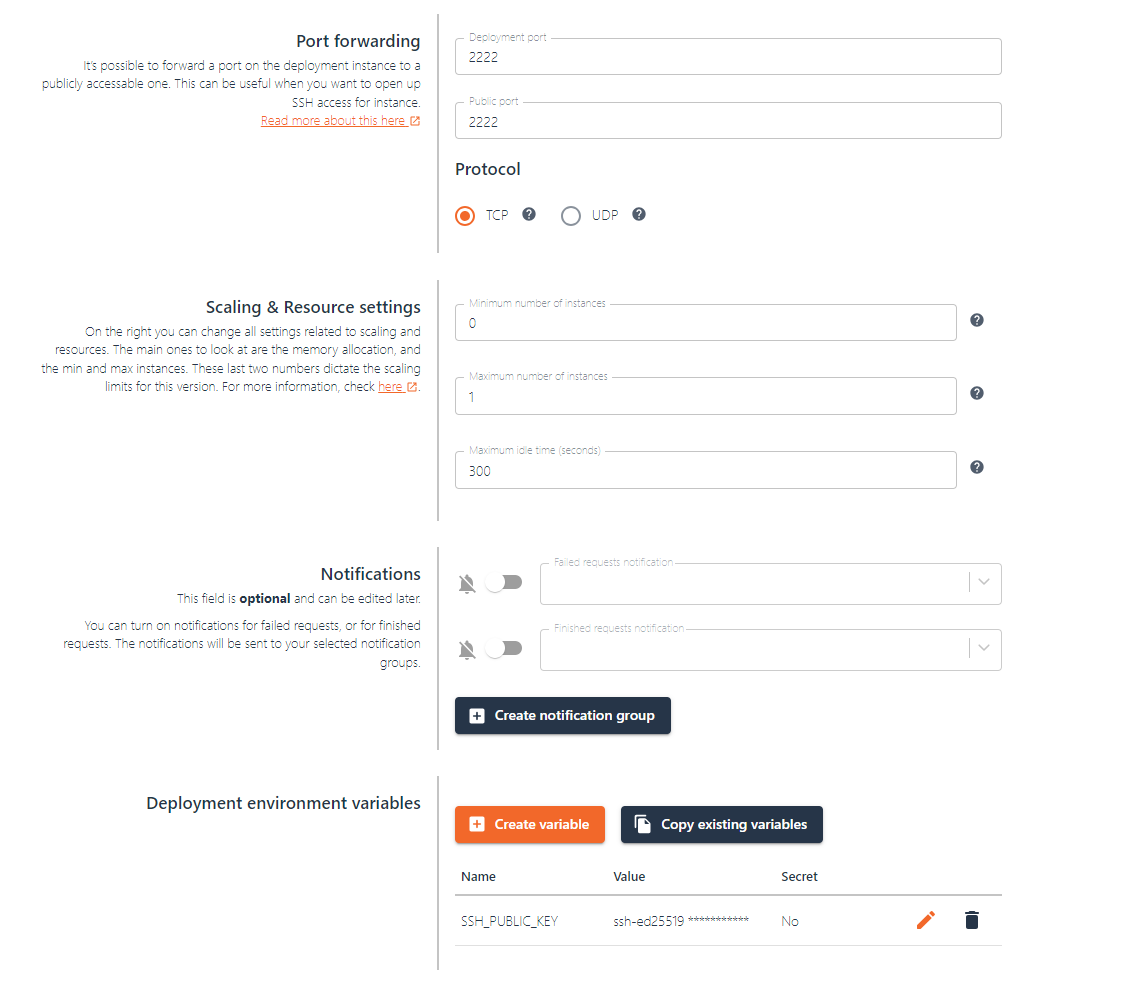
Go to you environment settings and ensure that you are using a dedicated instance type, these instances have dedicated in their name. We need this to be able to use port forwarding as it is only supported on these specific instance types.
Now scroll down to the Port forwarding section and use 2222 for both the deployment and the public port. You can also use any other public port as long as it is >= 1024. You can leave the protocol on TCP.
Lastly, create a new environment variable called SSH_PUBLIC_KEY and use your public key as the value. If you don't have one yet, you first need to generate a new SSH key pair.
Click Save and your deployment will start rebuilding using the new changes.
Connecting to your deployment from your terminal
Now that your deployment is adjusted, you can connect to any running instance of it via SSH from your terminal! When a new instance initializes, it will print the IP address it's running on in the logs. You can use this value to set up a connection like this:
ssh deployment@<ip_address> -p 2222
To test this out, you can temporarily change the minimum number of instances of your deployment to 1. This will spin up a new instance. In the logs you will be able to see the IP address. Copy this and use it in the ssh command. If it went successfully you should see something like this:

Now that you have your connection established you can start exploring! You can run commands like ls or top to inspect what's going on inside your deployment instance. Note that you do not have sudo permissions during your connection.
If you run into any issues or have any questions, do not hesitate to reach out to our support.
You might get a 'remote identification changed' warning
When a deployment gets the same IP assigned as it had once before, you might get a warning when trying to connect via SSH that "the remote host identification changed". This is because the host keys are generated upon initialization of the deployment, so they will be different for every deployment instance, while it might have the same IP as another instance had before. In case this happens, you can remove the IP address from your known hosts file, and you should be able to connect again.