Push your Docker environments to UbiOps
Building and pushing a Docker image is the recommended way of using your own environments in UbiOps.
You can build a Docker image locally or use an image that you already have available. Then push the image to UbiOps or upload a tarball of the image.
While preparing your image, also consider whether your environment needs to support the UbiOps request format.
This guide assumes basic familiarity with Docker images and containerization. If you're new to these concepts, see Docker's Get Started guide.
Building the environment
Preparing an image for use in UbiOps is as simple as a standard Docker build, for example:
docker build --platform linux/amd64 -t my-image -f Dockerfile .
When you're deploying on GPUs, make sure that libraries such as CUDA are included in your image and that their versions are supported on the type of GPU that you are planning to deploy on.
Pushing the environment
When creating an environment in the WebApp, the Push environment dialog shows the commands needed to log in to the UbiOps registry and push your image, filled in with your project and environment name:
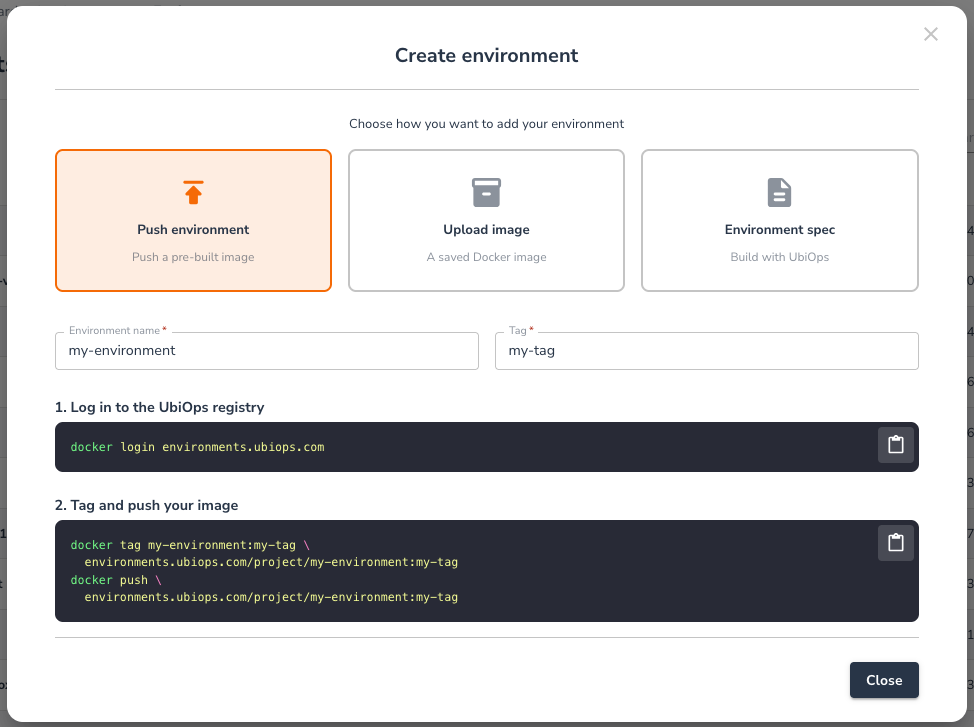
Logging in to the registry
docker login environments.ubiops.com
Use your UbiOps email address as the username. For the password:
- If you log in to UbiOps with an email and password, use that same password.
- If you use a service user, use the service user's email address as the username, and its full API token as the password, without a
TokenorBearerprefix.
Single sign-on (SSO) is not supported for docker login
If you log in to UbiOps through SSO, your account has no UbiOps password, so docker login can't authenticate you directly. Use a service user and its API token instead.
Uploading the environment
As an alternative to pushing, you can upload an archive with the Docker image. This option is only recommended if pushing images is not possible in your UbiOps cluster.
Create an archive from your Docker image:
docker save <image-name> -o image.tar
If your Docker image is a remote image, please pull it first such that you can create an archive from it.
Then upload the image through the interface in the WebApp.
If your image is large, we recommend uploading it with the ubiops environments deploy command of the Command Line Interface.
Supporting request format
There are two types of deployments that can run in UbiOps: deployments that support request format and that don't. Supporting request format indicates whether a deployment supports requests using the UbiOps deployment request format.
Before uploading a Docker image, it is important to understand what kind of application you want to run. Regular deployments (with a deployment package ZIP file) support requests by default. However, to use this functionality with Bring Your Own Docker Image, your Docker image should be based on a UbiOps deployment image. Please contact our support team to get access to UbiOps deployment images. In case your application doesn't require any UbiOps-format request functionality, and just needs to run as is, e.g. a Jupyter notebook server, WebApp, or API, you can disable support for requests during the deployment and environment creation. See the table below for the differences between two types of deployments.
| Functionality | Request format enabled | Request format disabled |
|---|---|---|
| Version control |  | |
| Scaling instances | Autoscaling | Manual scaling |
| Request creation and queuing | |  |
| Request retention and traceability | | |
| Request schedules | | |
| Port forwarding | | |
It's important to note that the deployments that don't support request format allow for the retention and traceability of requests only for requests made through services.